Admin Functions
Manage Merchant Accounts
A “Merchant Account” is a type of bank account that allows individuals, businesses and organizations to accept and process payments by debit or credit cards. To setup and manage a Platform merchant account, click on the “Admin Functions” button and select the “Manage Merchant Accounts” tab. When initially navigating to this page, it displays a blank table.
Adding a Merchant Account
To add a merchant account, click the “Add Merchant Account” button to bring up the “Add/Edit Merchant” screen (below).

1) Enter the account name into the “Name” field. This field is alpha-numeric and is for your reference only; it is not system generated or pre-assigned.
2) Select the “Merchant” (also known as the Credit Card Processor or Gateway) from the drop-down menu. Keep in mind that the “Bypass” option is only used for test merchant accounts. No credit cards will be charged when utilizing this merchant selection. Depending on your Merchant selection, additional fields will be required (User Id and/or Key).
3) Select the account “Status” (Active or Inactive). Only one merchant account may be active at any given time. If more than one merchant account is setup, activating one account will automatically deactivate the other(s).
4) Click the “Save” button to save your changes or the “Back” button to exit the form without saving changes.
5) You will return to the “Manage Merchant Accounts” page. If the newly created account was saved, it will display on the table.
After creating a new merchant account, the unique account identifier(s) – “User Id” and/or “Key” – must be entered as necessary. Also, the state(s) where the Platform company or organization reside – otherwise known as your “Nexus” state(s) – need to be setup for sales tax purposes. Follow the steps below to complete these portions of account setup.
6) Click on the merchant account “Name” hyperlink to access the account information on the “Add/Edit Merchant” screen. See screen shot below.
7) Enter the “User Id” and/or “Key,” as determined by your Merchant Account Provider, into the designated fields. If either of these codes is not associated with your account, just enter dummy data here as these are both required fields.
8) Select the Nexus state(s) from the drop-down menu, and after each selection, click the “Save” button to add the state to the list.
9) For each state added to the list, select “Include” to include the State and Local (City and/or County) taxes, or select “Do not include” to only include State taxes.
10) Click “Delete” to remove a Nexus state from the list.
11) Click the “Save” button at the top of the screen to save your changes, or “Back” to exit the form without saving changes.
Vendor Functions
Manage Vendor Profiles
Click on the “Admin Functions” button. From the left navigation pane, select the “Vendor Functions” tab and then the “Manage Vendor Profiles” sub-tab. Upon platform delivery, a “Test Vendor” account will be listed here (see below).
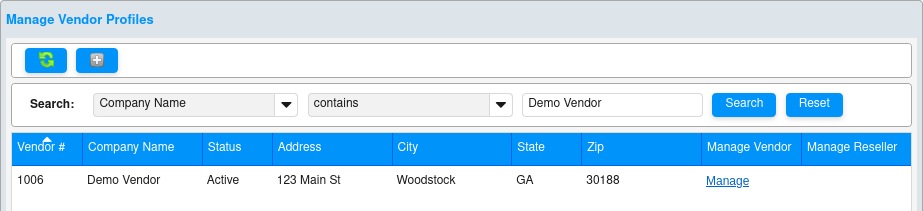
All Platform Vendors are setup and accessed from this screen. See below example of a multiple-Vendor listing on the “Manage Vendor Profiles” page.
Sorting Vendor Profiles
The “Vendor#,” “Company Name,” and “Status” fields on the Vendor Profile table can be sorted by clicking on the respective column header. Upon initially clicking on one of these headers, an arrow icon pointing up displays above the column header name, and the Vendor list sorts ascending by the respective column parameter. After clicking on the same header a second time, an arrow icon pointing down displays above the column header name, and the list sorts descending.
Manage Vendor Profiles – Field Definitions
Vendor # - System-generated Vendor Id number created when the account is originally setup by the Platform Administrator.
Company Name – The Vendor’s business name.
Status – The Vendor account’s “Active” or “Inactive” status indicator. If “Active” is indicated, the Vendor’s inventory will be available to display on Platform eStores as appropriate; however, if “Inactive” is indicated, none of the Vendor’s inventory will display on any Platform eStores.
Address, City, State, Zip – The Vendor’s physical address info.
Manage Vendor – Click on the Manage hyperlink in this column adjacent to the Vendor record to be accessed. After clicking this link, the Admin screen changes to the Vendor management functions for the specific Vendor being managed. In effect, the Admin user “becomes” the select Vendor.
Manage Reseller – In the case of a Custom Vendor, which is setup by a Reseller and is affiliated with his/her Reseller account only, click the hyperlink in this column (i.e. Reseller 1000) to access the Custom Vendor’s affiliated Reseller account. After clicking this link, the Admin screen changes to the Reseller management functions for the specific Reseller being managed. In effect, the Admin user “becomes” the select Reseller.
Adding a Vendor
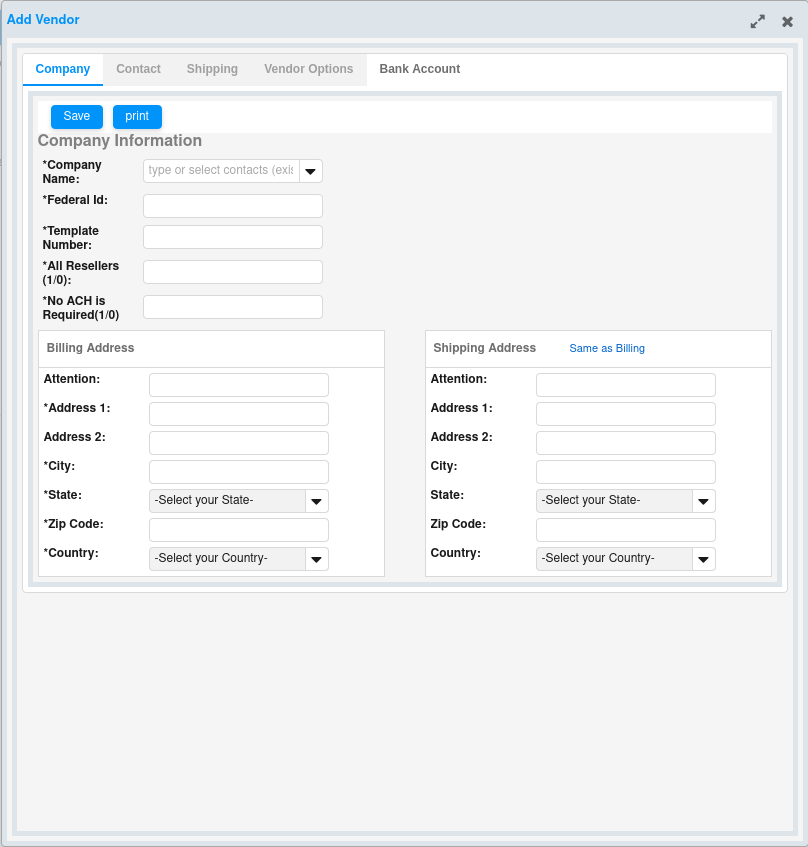
To add a new Vendor account, click the plus button to bring up the “Add Vendor” screen, which is comprised of five Vendor Profile tabs described below.
1) Company – Basic Company information is entered here – Company Name, Federal Id, Billing Address and Shipping Address. Required fields are marked with an asterisk (*). See image below.
2) Contact – Vendor Contact information is entered here. Platform Management will reference this profile tab when they need to contact the Vendor for any reason (i.e. inventory, order, or shipment issues, or customer inquiries). A primary and secondary Vendor representative may be entered. Required fields are marked with an asterisk (*).
If the Vendor prefers to be notified by email each time a new order is placed on the platform, select “Yes” for “Email Notification of new Orders,” and enter the email address to which the notification should deliver into the “Email Address for new Orders” field.
If the Vendor prefers instead to not receive these notifications, then select “No” for this setting. Scenarios when this option may work best include Vendors receiving very large order quantities, or those who have opted to process orders automatically (i.e. via EDI fulfillment).
3) Shipping – There are three settings available on this page.
-
Shipping Account Id – This field is for future development. Ignore for now.
Average Shipping Zone – Click the drop-down arrow and select the “Average Shipping Zone” for the Vendor account. This zone will be referenced for all packages shipped via the Calculated shipping type. The Vendor zone and the package weight are considered when figuring Calculated shipping cost.
-
Rack rates for UPS zones 2 thru 8 are loaded to all platforms by default. Additionally, the Platform Administrator and/or the Vendor may upload customized rate charts as well. All zones available to each Vendor account will display in the Average Shipping Zone drop-down menu.
-
Shipping Method – This setting determines the Vendor’s default “Shipping Method” (or speed). This method will be available for all items ordered from this Vendor’s inventory, and cannot be deleted as an option; however, it does not preclude the Vendor from offering alternative shipping methods. In most cases, the preferred default Shipping Method is “Ground” and the Vendor may opt to offer 2-Day and 1-Day speeds as well. If the Vendor prefers to change their default Shipping Method, they may select “2Day Shipping” or “1Day Shipping” on this screen.
4) Vendor Options – There are seven settings available on this page.
-
Vendor Status – Select “Active” or “Inactive” from the drop-down menu. If “Active” is selected, the Vendor’s inventory will be available to display on Platform eStores as appropriate; however, if “Inactive” is selected, none of the Vendor’s inventory will display on any Platform eStores.
-
Order ID 1 – This field is for future development. Please leave blank for now.
-
Order ID 2 – This field is for future development. Please leave blank for now.
-
Order Interface Options – This field is for future development. Please leave blank for now.
-
Order Charge – If the Vendor wishes to add a handling fee to each order, the dollar amount is entered here (i.e. 2.50). Handling fees are factored into the shipping cost per order. If no handling fee is desired, leave this field blank.
-
Notes – Enter any Vendor notes here as necessary (i.e. setup date, activation date, inventory update schedule, etc.)
-
Reseller Id – The Platform Administrator may filter each Vendor’s inventory to one of three Reseller Group options:
- All Resellers – This is the default “Reseller Id” setting, and if saved, means that the Vendor’s inventory will be available to All Resellers on the Platform.
- Selected Reseller – This setting should be selected to designate one specific Reseller to whom the Vendor’s entire inventory will be exclusively filtered. Upon choosing “Selected Reseller” from the “Reseller Id” dropdown menu, a text field will display to the right of the drop-down box. Enter the Reseller Id for the individual Reseller here (i.e. 1000).
- Resellers Group – This setting should be selected to designate one or more “Reseller Groups” to whom the Vendor’s entire inventory will be exclusively filtered. Upon choosing “Resellers Group” from the dropdown menu, a listing of available Reseller Groups will display to the right of the “Reseller Id” drop-down box. Check one or more boxes adjacent to the appropriate group names here (i.e. Specialty and Boutiques).
5) Bank Account – If the Platform Administrator provides the option for the Vendor to be paid (for cost of goods and/or shipping cost) via ACH transactions to a select bank account, and the Vendor wishes to utilize this payment option, then click on the “Bank Account” tab to enter the Vendor’s banking information.
-
Enter the bank account’s “Routing Number” and “Account Number” into the designated fields, and click the “Submit for Tokenization” button.
-
A confirmation dialog box will display indicating that the “Account has been Tokenized.”
-
Click the “OK” button and the entered number values will be masked, with only the last 4 digits of each displaying on the “Bank Account” tab.
Vendor Profile Search Options
When multiple Vendor accounts have been setup on the Platform (example below), the list can be searched by “Company Name,” “Vendor Id,” or Active/Inactive “Status.” Simply select the Search parameter from the first drop-down menu (Company Name, Vendor Id or Status), select a qualifier from the second drop-down menu (i.e. contains, equals, etc.), enter the search criteria into the third field, and click the “Search” button. All Vendors meeting the selected and entered criteria will display on the Vendor Profile list. Click the “Reset” button to refresh the screen and return to the complete Vendor listing.

Quick Edit
To quickly edit key Vendor Profile fields, click to highlight the Vendor record to be modified. This will populate the fields in the lower “Quick Edit” pane with the associated Vendor Number, Company Name, Status, and Contact Email.
Edit the Vendor’s Company Name, Active/Inactive Status or Contact Email as needed and click the “Update” button. The new data will save to the Vendor Profile and will display on the Vendor Profile list where appropriate.
Download Vendor Profiles
Click on the “Admin Functions” button. From the left navigation pane, select the “Vendor Functions” tab and then the “Download Vendor Profiles” sub-tab.
From this screen, click the “Download CSV” button . This will prompt the user to open the file in a spreadsheet application such as Excel. The downloaded Vendor Profiles’ CSV file contains the fields described below.
Vendor Profiles (CSV Download) – Field Definitions
Company Name – The Vendor’s business name.
Vendor # - System-generated Vendor Id number created when the account is originally setup by the Platform Administrator.
Status – Indicator of the Vendor’s “Active” or “Inactive” status. If “Active” is indicated, the Vendor’s inventory will be available to display on Platform eStores as appropriate; however, if “Inactive” is indicated, none of the Vendor’s inventory will display on any Platform eStores.
Address, City, State, Zip – The Vendor’s physical address info.
Reseller – If the Vendor account record is that of a Custom Vendor, then, the Vendor account was setup by a specific Reseller and is affiliated with his/her Reseller account only. This field indicates this single Reseller (if any). If no Reseller is indicated here, the associated Vendor is affiliated with either all or multiple Platform Resellers.
Contact Name – Name of the Vendor’s primary contact.
Contact Email – Email address for the Vendor’s primary contact.
Contact Phone – Phone number for the Vendor’s primary contact.
Manage Shipping Zones
Click on the “Admin Functions” button. From the left navigation pane, select the “Vendor Functions” tab and then the “Manage Shipping Zones” sub-tab. This will bring up the “Shipping Zone Manager” page. From this screen, the Platform Administrator may view, add, modify, or delete the shipping zone rate charts which will be available to all Platform Vendors.
View Shipping Zones
UPS shipping zones 2 through 8 will be pre-loaded to the Platform upon delivery (see below).
To view one of these default shipping zones, click on the drop-down arrow to select one (i.e. UPS Zone 4). The associated zone rate chart will then populate the table (see example below).

Shipping Zone Rate Chart – Field Definitions
Shipping Type – Indicates if the adjacent rates are for Next Day, 2nd Day or Ground shipping speeds.
Weight Limit – Indicates the weight (in pounds) that generates the associated shipping cost.
Cost – The shipping fee (in US dollars) associated with the adjacent Shipping Type (Next Day, 2nd Day, or Ground) and Weight Limit (in pounds).
Per 100 Units – The heavy weight indicator for packages over 150 lbs. This field can contain one of two valid values:
1) N for “No” – In this case, there is no additional cost per pound as there is with heavier packages. An “N” will populate this field for all weights ranging from 1 lb. to 150 lbs. under every shipping speed (Next Day, 2nd Day and Ground).
2) Y for “Yes” – In this case, the cost shown is the additional cost per pound added to the shipping fee for 150 lbs. A “Y” will populate the field for 151 lbs. only, under every shipping speed (Next Day, 2nd Day or Ground). For example, if the cost to ship 150 lbs. is $125.00, and the additional cost per pound over 150 lbs. is $1.50, then the cost for 151 lbs. will be $126.50 [$125.00 + $1.50], and the cost for 152 lbs. will be $128.00 [$125.00 + (2 x $1.50)], etc.
Reseller Functions
Manage Reseller Profiles
Click the “Admin Functions” button. From the left navigation pane, select the “Reseller Functions” tab and then the “Manage Reseller Profiles” sub-tab. All Resellers are itemized in this section, and can be accessed from this screen. There are two types of Resellers: Template Resellers and Regular Resellers (defined below).
Template Resellers
Upon platform delivery, Template Resellers #1 through #10 are available by default (see screen shot below). Additional Template Resellers (up to 999) can be added at the request of Platform Management. EStores affiliated with Template Resellers are not selling sites. Instead, the Platform Administrator may utilize Template Resellers to create pre-set eStore layouts and content that can then be copied to any number of Regular Reseller eStores (those with selling sites).
Setting Up Template Resellers
If Platform Management intends to create one or more default Template Resellers – including all eStore layout, design and content attributes – that can then be applied to Regular Resellers, this process starts from the first page of the “Reseller Profiles Manager”.
To get started, click the “Manage” hyperlink in the far right column adjacent to the Template Reseller to be setup with default layout and content. Then, click on the “eStore Manager” button. Select the “Customize Store” tab from the left navigation pane and then the “Assigned Templates” sub-tab. Proceed with selecting layouts per page type, and adding Widget content to the various row cells within the applicable containers.
NOTE: For step-by-step instructions on setting up the content and layout of any eStore (Template or Regular), please reference the Reseller Help Manual located at Support -> Help while managing any Reseller.
Regular Resellers
Regular Reseller accounts are those associated with selling eStores. Upon Platform delivery, the Regular Resellers can be accessed starting with Demo Store #1000 on page 2 of the “Reseller Profiles Manager.” As new Resellers are setup (manually or automatically), each will be a Regular Reseller with a system-generated Id that increments up chronologically from #1000.
Reseller Profiles Manager – Field Definitions
Reseller # - System-generated Reseller Id number created when the account is originally setup by the Platform Administrator.
Company Name – The Reseller’s business name.
Status – The Reseller account’s “Active,” “Inactive” or “Preview” status indicator. If “Active” is indicated, the Reseller’s eStore will display online, and live transactions can be completed normally. If “Inactive” is indicated, the Reseller’s eStore will not display online at all. And if “Preview” is indicated, The Reseller’s eStore can be accessed online; however, no purchases can be made. Any attempt to purchase on a Preview store will generate an error message indicating that the eStore is for demo purposes only and the sale will not complete.
Address, City, State, Zip – The Reseller’s physical address info.
Account Number – A Platform-generated Reseller account identification number (if any). Not all Platforms utilize a separate Reseller account number system, but it is available for those who need it.
Package – If the Platform Administrator has setup various “Package” options for Resellers to purchase with differing features, benefits, costs, etc., the associated Reseller Package name displays here.
Manage – Click the Manage hyperlink in this column adjacent to the Reseller record to be accessed. After clicking this link, the Admin screen changes to the Reseller management functions for the specific Reseller being managed. In effect, the Admin user “becomes” the select Reseller.
Adding a Reseller
To add a new Reseller account, click the plus button to bring up the “Add Reseller” screen, which is comprised of six Reseller Profile tabs described below.
1) Company – Basic Company information is entered here – Company Name, Federal Id, Billing Address and Shipping Address. Required fields are marked with an asterisk (*).
If the Reseller would like to be notified by email each time a new order is placed on his/her eStore, check the “Notify on New Order” box, and enter the email address to which the notification should deliver into the “Notify Email Address” field. If, instead, the Reseller prefers not receive these notifications, then leave these fields blank.
2) Contact – Reseller Contact information is entered here. Platform Management will reference this profile tab when they need to contact the Reseller for any reason (i.e. to inform them regarding platform-driven ad options or new eStore features). See screen shot below. A primary and secondary Reseller representative may be entered. Required fields are marked with an asterisk (*).
3) Product Collections – The Platform may opt to setup Product Collections (see section 8.4. Product Collections). These Product Collections are comprised of inventory items from one or more Vendor Groups (see Vendor Management Manual, section 5.1. Vendor Group Management), and can pull from any or all Platform Vendors to create the Product Collections.
On this tab of the Reseller Profile, Product Collections may be assigned to the Reseller. If one or more Product Collection is assigned to the Reseller, then the associated eStore will display products filtered to “All Resellers” as well as items filtered to their assigned Product Collections. On the other hand, if no Product Collections are assigned to the Reseller, the associated eStore will only display items filtered to “All Resellers.”
Check the boxes adjacent to the Product Collections to be assigned to the Reseller (if any), and “Save.” See example screen shot below where Product Collections named “Expanded Lines” and “Seasonal Lines” have been assigned to the Reseller.
4) Reseller Settings – There are four optional settings available on this page.
-
Reseller Domain – The Reseller may opt to customize their Reseller Domain for all non-secure eStore pages. The Platform Administrator may determine an additional cost for this feature; if so, the Reseller needs to be aware of this fee prior to setup. If the Reseller chooses to utilize the custom Reseller Domain feature, enter the desired URL (web address) here (i.e. www.cscestorexpress.com). When custom Reseller Domain setup is complete, click the “Check to Activate” box.
-
Reseller Subdomain – The Reseller may opt to customize their Reseller Subdomain for all non-secure and/or secure eStore pages. The Platform Administrator may determine an additional cost for this feature; if so, the Reseller needs to be aware of this fee prior to setup. If the Reseller chooses to utilize the custom Reseller Subdomain feature, enter the desired Subdomain name here (i.e. cscestorexpress). When custom Reseller Subdomain setup is complete, click the “Check to Activate” box.
-
Google Analytics Id – The functionality providing Platform integration with Google Analytics is currently being enhanced, and will be accessed in the “Information Page” areas going forward. This field can be left blank for now, and may be removed in the near future.
-
Ship to Store – If the Reseller wishes to offer an option to ship customer orders to a physical store address, check the “Allow reseller to ship to store address” box. In order to activate the “Ship to Store” feature, a “Shipping Address” must be entered on the “Company” tab of the Reseller Profile.
5) Reseller Options – There are six settings available on this page.
-
Account Number – If Platform management requires a Reseller account number (other than the system-generated Reseller Id) for internal reference purposes, this number should be entered here. Not all Platforms utilize a separate Reseller account number system, but this field is available for those who need it.
-
Allow Custom Vendor(s) – Check this box if the Reseller will be allowed to setup custom Vendors whose inventory will be available to his/her eStore only.
-
Allow Reseller to override merchant account – Check this box if the Reseller will be allowed to setup a merchant account exclusive to their eStore, which overrides the Platform merchant account (if any). If the Reseller opts to utilize this feature, then full payment for all related eStore purchases will post to the Reseller’s merchant account, and the Reseller will need to be separately invoiced for cost of goods, shipping costs, and/or Platform margin.
-
Reseller Status – Select “Active,” “Inactive,” or “Preview” from the drop-down menu See below). If “Active” is selected, the Reseller’s eStore will display online, and live transactions can be completed normally. If “Inactive” is selected, the Reseller’s eStore will not display online at all. And if “Preview” is selected, The Reseller’s eStore can be accessed online; however, no purchases can be made. Any attempt to purchase on a Preview store will generate an error message indicating that the eStore is for demo purposes only and the sale will not complete.
-
Reseller Package – The Platform Administrator may opt to setup various “Reseller Package” options (with differing features, benefits, costs, etc.) from which Resellers may select when originally purchasing their eStore. If this is the case, then the various packages will display in the drop-down menu. If applicable, select the desired Reseller Package here (i.e. Premium).
-
Notes – Enter any Reseller notes here as necessary (i.e. setup date, activation date, etc.)
6) Bank Account – If the Platform Administrator provides the option for the Reseller to be paid commissions via ACH transactions to a select bank account, and the Reseller wishes to utilize this payment option, then click on the “Bank Account” tab to enter the Reseller’s banking information.
- Enter the bank account’s “Routing Number” and “Account Number” into the designated fields, and click the “Submit for Tokenization” button.
- A confirmation dialog box will display indicating that the “Account has been Tokenized.”
- Click the “OK” button and the entered number values will be masked, with only the last 4 digits of each displaying on the “Bank Account” tab.
Reseller Profile Search options
When multiple Reseller accounts have been setup on the Platform, the list can be searched by “Company Name,” “Reseller Id,” or Active/Inactive/Preview “Status.” Simply select the Search parameter from the first drop-down menu (Company Name, Reseller Id or Status), select a qualifier from the second drop-down menu (i.e. contains, equals, etc.), enter the search criteria into the third field, and click the “Search” button. All Resellers meeting the selected and entered criteria will display on the Reseller Profile list. Click the “Reset” button to refresh the screen and return to the complete Reseller listing.
Sorting Reseller Profiles
The “Reseller#,” “Company Name,” and “Status” fields on the Reseller Profile table can be sorted by clicking on the respective column header. Upon initially clicking on one of these headers, an arrow icon pointing up displays above the column header name, and the Reseller list sorts ascending by the respective column parameter. After clicking on the same header a second time, an arrow icon pointing down displays above the column header name, and the list sorts descending.
Quick Edit
To quickly edit key Reseller Profile fields, click to highlight the Reseller record to be modified. This will populate the fields in the lower “Quick Edit” pane with the associated Reseller Number, Company Name, Status, and Contact Email.
Edit the Reseller’s Company Name, Active/Inactive/Preview Status or Contact Email as needed and click the “Update” button. The new data will save to the Reseller Profile and will display on the Reseller Profile list where appropriate.
Download Reseller Profiles
Click on the “Admin Functions” button. From the left navigation pane, select the “Reseller Functions” tab and then the “Download Reseller Profiles” sub-tab.
From this screen, click the “Download CSV” button . This will prompt the user to open the file in a spreadsheet application such as Excel. The downloaded Reseller Profiles’ CSV file contains the fields described below.
Reseller Profiles (CSV Download) – Field Definitions
Company Name – The Reseller’s business name.
Reseller Id - System-generated Reseller Id number created when the account is originally setup by the Platform Administrator.
Status – Indicator of the Reseller’s “Active,” “Inactive,” or “Preview” status. If “Active” is indicated, the Reseller’s eStore will display online, and live transactions can be completed normally. If “Inactive” is indicated, the Reseller’s eStore will not display online at all. And if “Preview” is indicated, The Reseller’s eStore can be accessed online; however, no purchases can be made. Any attempt to purchase on a Preview store will generate an error message indicating that the eStore is for demo purposes only and the sale will not complete.
Address, City, State, Zip – The Reseller’s physical address info.
Contact Name – Name of the Reseller’s primary contact.
Contact Email – Email address for the Reseller’s primary contact.
Contact Phone – Phone number for the Reseller’s primary contact.
Manage Reseller Package
Click on the “Admin Functions” button and select the “Manage Reseller Package” button from the left navigation pane. The Platform Administrator may opt to setup various “Reseller Package” options (with differing features, benefits, costs, etc.) from which Resellers may select when originally purchasing their eStore. If this is the case, these Reseller Packages are setup from this screen (see examples below).

Adding a New Reseller Package
Click on the “Add” button to bring up the “Add New Package” box. Enter the “New Package Name” into the text field, and click the “Save” button.
Editing a Reseller Package
Click on the Edit hyperlink adjacent to the Reseller Package to be modified. This will bring up the “Edit Package” box. Change the package name as desired, and click the “Save” button. A confirmation dialog box will pop-up reading, “Package updated successfully.” The revised Reseller Package name will then be reflected on the “Manage Reseller Package” screen.
Deleting a Reseller Package
Click to highlight the Reseller Package record to be deleted, and click the “Delete” button. A confirmation dialog box will pop-up reading, “Package deleted successfully.” Click the “OK” button, and the selected package will no longer display on the Reseller Package list.
Product Collections
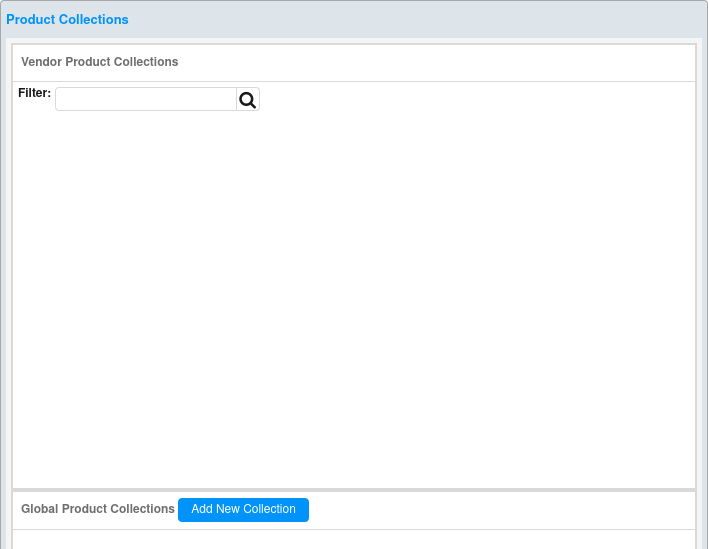
Click on the “Admin Functions” button and select the “Product Collections” tab from the left navigation pane. All “Vendor Product Collections” previously setup on the Platform will display in the top pane. These Vendor Collections are sub-sets of individual Vendor inventories. “Global Product Collections” (groupings of one or more Vendor Product Collection) are created in the bottom pane. These Global Product Collections can be utilized by the Platform Administrator for filtering Vendor Product Collections (across multiple Vendors) to designated Resellers or Reseller Groups and/or to specific Platform categories or subcategories.
Creating New Product Collections
Click on the “Add New Collection” button in the bottom pane to bring up the “Add Group” box. Enter the “Group Name” for the new Global Product Collection into the text field and “Save.”
Adding Vendor Product Collections to Global Product Collections
Drag and drop the Vendor Product Collections from the top pane to the desired Global Product Collection box(es) in the bottom pane. With each drag and drop, the selected Vendor Collection will be added to the Global Collection.
To confirm that a Vendor Collection has been added, mouse over the Global Product Collection box. This will pull up a drop-down box itemizing the Vendor Product Collection(s) contained in the respective Global Product Collection.
Edit Group
As a second option for managing Product Collections, click on the pencil edit icon in the Global Product Collection box in the bottom pane. This will bring up the “Edit Group” screen. To add Vendor Collections to the Global Collection, drag and drop the desired Vendor Product Collections from the right-hand “Select From” pane to the left-hand “Select In” pane. Or, to remove Vendor Collections from the Global Collection, drag and drop the desired Vendor Product Collections from the left-hand “Select In” pane back to the right-hand “Select From” pane.
Editing Collection Name
To edit the Global Product Collection name, click on the name hyperlink (i.e. Basic Lines) at the top left of the “Edit Group” screen. This will bring up a text field in which the Collection name can be modified and saved.
Filtering Product Collections
To filter through the Vendor Product Collections contained in either the “Select From” or the “Select In” pane, enter all or part of the Vendor number or Collection name into the respective filter field and click the magnifying glass search icon. This will query all Vendor Product Collections meeting the entered criteria. Click the “Refresh” button to restore the complete Collection view.
Rebuild Search Index
Click on the “Admin Functions” button and select the “Rebuild Search Index” tab from the left navigation pane. Following any of the actions itemized below, the Search Index must be rebuilt in order for on-store search to accurately query the appropriate products.
-
Inventory added, activated or deactivated
-
Vendor account activated or deactivated
-
Vendor account filter added or edited
-
Inventory filter added or edited
-
Category filter added or edited
-
Category or subcategory activated or deactivated
To update the index, simply click the “Rebuild Search” button.
A confirmation dialog box will pop up indicating that the “Rebuild has been requested.” Click the “OK” button.
Wait several minutes, and the revised search index should reflect on any impacted eStore whenever an applicable search query is run.
Manage Templates
Click on the “Admin Functions” button and select the “Manage Templates” tab from the left navigation pane. This screen displays the Template layout options available for each eStore page type, including:
· Home Page
· Information Pages
· Category and Sub category
· Shopping Cart, Checkout Pages
· Product Pages
· Customer Pages
· Cartridge Finder
· Search Result Page
Click on the plus icon to expand the Template menu for each eStore page type. At this time, all page types (except Shopping Cart, Checkout Pages and Customer Pages) have three Template layout options: Template A, Template B, and Template C. The Shopping Cart, Checkout Pages and Customer Pages default to Template A and cannot be edited due to their unique display and security requirements.

Templates
Click on the Template thumbnail images in the expanded Template view under each page type. This will pull up a larger view of a sample eStore layout of the selected page type in the right-hand pane. See Template descriptions and sample screen shots below.
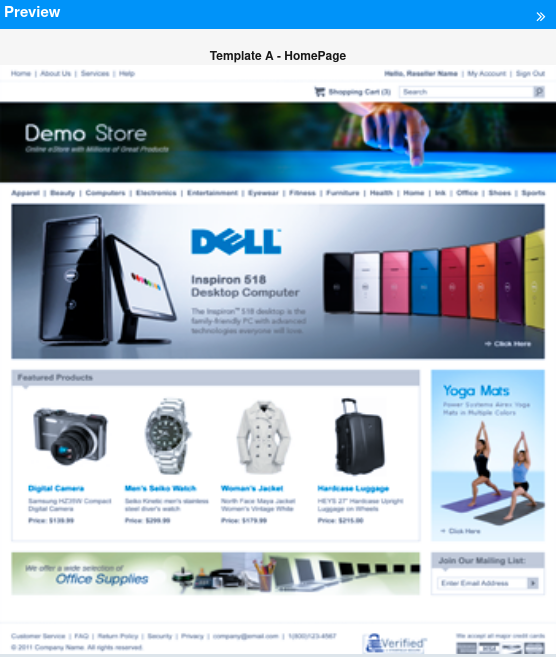
1) Template A – The Center Container extends 940 pixels, across the full width of the eStore, with a 20 pixel margin on each side. Both North and South Containers extend 980 pixels, across the full width of the eStore, with no margin on either side. See sample Home Page layout below.
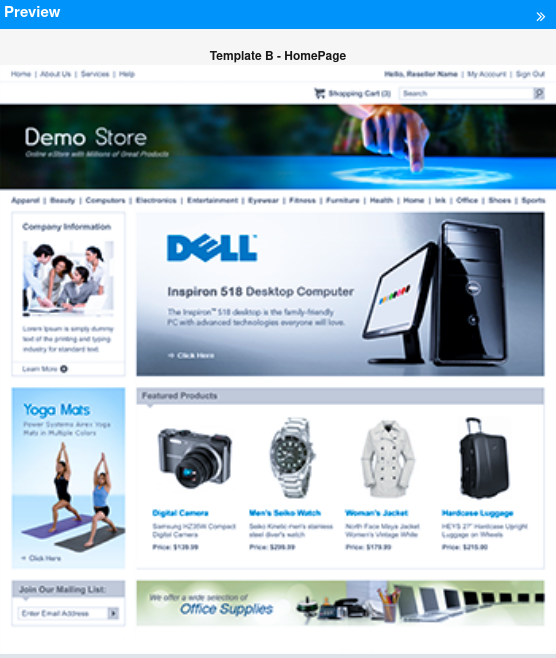
2) Template B – The Center Container extends 720 pixels across the width of the eStore with a 20 pixel right-hand margin and a 10 pixel left-hand margin. A 200 pixel wide West Container displays as a column to the left of the Center Container, with a 20 pixel left-hand margin and a 10 pixel right-hand margin. Both North and South Containers extend 980 pixels, across the full width of the eStore, with no margin on either side. See sample Home Page layout below.
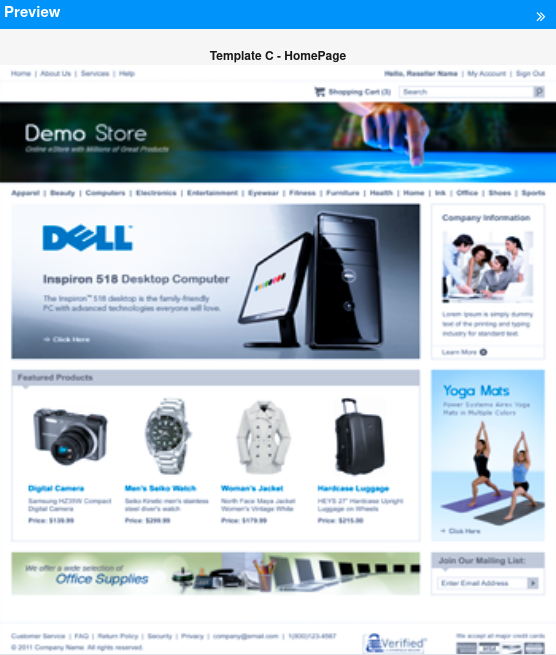
3) Template C – The Center Container extends 720 pixels across the width of the eStore with a 20 pixel left-hand margin and a 10 pixel right-hand margin. A 200 pixel wide East Container displays as a column to the right of the Center Container, with a 20 pixel right-hand margin and a 10 pixel left-hand margin. Both North and South Containers extend 980 pixels, across the full width of the eStore, with no margin on either side. See sample Home Page layout below.
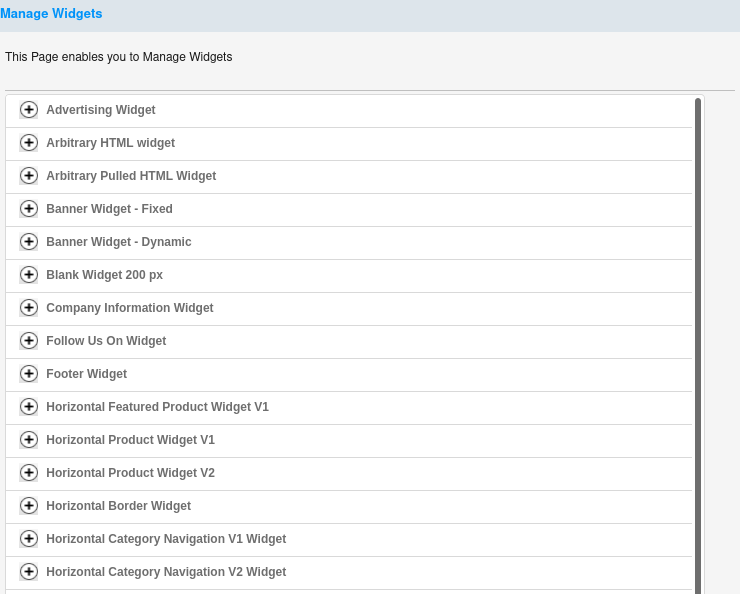
Manage Widgets
Click on the “Admin Functions” button and select the “Manage Widgets” tab from the left navigation pane. All Platform Widgets are itemized here, and can be accessed and edited from this screen. Click on the plus icon adjacent to each Widget to view its Properties. The properties selected here in the Widget Manager will serve as the default settings each time a Widget is placed within an eStore template. Depending on the level of permissions allowed by the Platform Administrator, Resellers may or may not be able to edit the Widget properties as determined in this section.
Editing Widget Properties
Click on the plus icon adjacent to the Widget to be edited. This will display the properties associated with the selected Widget. Click on the “Edit” button to access the properties’ editor for the selected Widget. The available properties will vary depending on the Widget selected. All Widgets will have default property values when initially accessed. When editing Widget properties, please note that some properties are designated as “Optional” and some are “Fixed” (greyed out) such that they cannot be edited. See example property editors for several of the most commonly used Widgets below:
Advertising Widget
The properties for the “Advertising Widget” are shown below. All of these properties are editable and none are optional.
· Width – Select from the available pixel dimension options in the drop-down menu.
· Border – Select “Yes” or “No” from the drop-down menu.
· Container Position – Check each Container in which the Widget should be available when setting up eStore layouts.
Arbitrary HTML Widget
The properties for the “Arbitrary HTML Widget” are shown below. All of these properties are editable and one is optional (Height).
· Height (optional) – Enter desired pixel dimension for the overall widget height.
· Border – Select “Yes” or “No” from the drop-down menu.
· Container Position – Check each Container in which the Widget should be available when setting up eStore layouts.
Banner Widget – Fixed
The properties for the “Banner Widget – Fixed” are shown below. Of these properties, one is editable and one is fixed (Container Position). Neither is optional.
· Image URL – Select from the banner images uploaded to the Platform Image Manager, or enter the internal or external image path here (if external URL is used, it must include http://).
· Container Position – Defaults to North Container only.
Banner Widget – Dynamic
The properties for the “Banner Widget – Dynamic” are shown below. All of these properties are editable and two are optional as indicated (Image Width and Image Height).
· Banner Height – Enter desired pixel dimension for the overall banner height.
· Background Color – Enter hexagonal number or select from the color picker or color wheel.
· Browse for Image – Select a default banner image file from those loaded to the Platform Image Manager.
· Image Width (optional) – Enter desired pixel dimension for image width.
· Image Height (optional) – Enter desired pixel dimension for image height.
· Image Position – Determine specific X/Y coordinates for image placement based on a top left or top right axis point.
· Image Alignment – Select top, middle, or bottom for the image Vertical Alignment, and select left, middle, or right for the image Horizontal Alignment.
· Text Position – Determine specific X/Y coordinates for text placement based on a top left or top right axis point.
· Text Alignment – Select top, middle, or bottom for the Vertical Alignment of the text, and select left, middle, or right for the Horizontal Alignment of the text.
Horizontal Featured Product Widget V1
The properties for the “Horizontal Featured Product Widget V1” are shown below. All of these properties are editable and none are optional.
· Header Width – Select from the available pixel dimension options in the drop-down menu.
· Header Font Color – Enter hexagonal number or select from the color picker or color wheel.
· Header Background Color – Enter hexagonal number or select from the color picker or color wheel.
· Featured Product Name Font Color – Enter hexagonal number or select from the color picker or color wheel.
· Featured Product Price Font Color – Enter hexagonal number or select from the color picker or color wheel.
· Container Position – Check each Container in which the Widget should be available when setting up eStore layouts.
Horizontal Product Widget V1
The properties for the “Horizontal Product Widget V1” are shown below. Of these properties, five are editable, and one is fixed (Container Position). None are optional.
· Header Width – Select from the available pixel dimension options in the drop-down menu.
· Header Font Color – Enter hexagonal number or select from the color picker or color wheel.
· Header Background Color – Enter hexagonal number or select from the color picker or color wheel.
· Product Name Font Color – Enter hexagonal number or select from the color picker or color wheel.
· Product Price Font Color – Enter hexagonal number or select from the color picker or color wheel.
· Container Position – Defaults to North Container only.
Horizontal Category Navigation V2 Widget
The properties for the “Horizontal Category Navigation V2 Widget” are shown below. Of these properties, four are editable, and one is fixed (Container Position). None are optional.
· Font Color – Enter hexagonal number or select from the color picker or color wheel.
· Background Color – Enter hexagonal number or select from the color picker or color wheel.
· Hover Over Background Color – Enter hexagonal number or select from the color picker or color wheel.
· Border – Check to select “Top Border,” “Bottom Border” or both, and select “Dotted Border” or “Solid Border” from the drop-down menu.
· Container Position – Defaults to North Container only.
Shopping Cart and Search Bar Widget
The properties for the “Shopping Cart and Search Bar Widget” are shown below. Of these properties, two are editable, and one is fixed (Container Position). None are optional.
· Shopping Cart Font Color – Enter hexagonal number or select from the color picker or color wheel.
· Search Bar Font Color – Enter hexagonal number or select from the color picker or color wheel.
· Container Position – Defaults to North Container only.
Slideshow Widget – Variable
The properties for the “Slideshow Widget – Variable” are shown below. All of these properties are editable and none are optional.
· Widget Width – Select from the available pixel dimension options in the drop-down menu.
· Widget Height – Enter desired pixel dimension for Widget height.
· Widget Border – Select “Yes” or “No” from the drop-down menu.
· Widget Alignment – Select top, middle, or bottom for the Vertical Alignment, and select left, middle, or right for the Horizontal Alignment.
· Widget Position – Determine specific X/Y coordinates for Widget placement based on a top left or top right axis point.
· Widget Margin – Enter desired pixel dimension for top, left, right, and bottom margins.
Top Navigation Bar Widget
The properties for the “Top Navigation Bar Widget” are shown below. Of these properties, two are editable, and one is fixed (Container Position). None are optional.
· Background Color – Enter hexagonal number or select from the color picker or color wheel.
· Font Color – Enter hexagonal number or select from the color picker or color wheel.
· Container Position – Defaults to North Container only.
Vertical Category Navigation V1 Widget
The properties for the “Vertical Category Navigation V1 Widget” are shown below. All of these properties are editable and none are optional.
· Show Header – Click to select “Yes” or “No.”
· Category Font Color – Enter hexagonal number or select from the color picker or color wheel.
· Category Hover Over Background Color – Enter hexagonal number or select from the color picker or color wheel.
· Container Position – Check each Container in which the Widget should be available when setting up eStore layouts.
Assign Templates
Click the “Admin Functions” button and select the “Assign Templates” button from the left navigation pane. This brings up the “Assign Templates” screen (see below). In this section, the Platform Administrator may assign eStore Template layouts to individual Resellers, multiple Resellers, or all Resellers.
Reseller List Views
The number of Resellers to display per page can be modified by clicking on the drop-down arrow at the top of the Reseller table. This drop-down field displays “10” by default upon initially navigating to the “Assign Templates” screen, and ten Resellers display per page. Click the drop-down arrow to change the page view to 25 or 50 Resellers per page as desired.
Three Methods to Assign Templates
1) Set Default Template for All Resellers – This method determines a default Template layout (including page type layout only; NOT page content) for all existing Resellers on the Platform.
NOTE: This action will override any previously setup Reseller Template layouts by page type, so do not utilize this option if that is not the intention. The best time to Set Default Template for All Resellers is in the early phases of Platform setup, or when it is the distinct intention of Platform Management to revert all current Resellers to a single Template layout assignment structure.
To set the default Template layout (by page type only) for all Resellers, follow the steps noted below.
· Click on the “Admin Functions” button and select the “Assign Templates” tab from the left navigation pane.
· From the Assign Templates’ screen, click on the “Set Default Template for All Resellers” button. This brings up the “Set Default Template” screen.
· Click on the plus icon to expand the Template layout menu for each eStore page type, including:
-
Home Page
-
Information Pages
-
Category and Sub category
-
Shopping Cart, Checkout Pages
-
Product Pages
-
Customer pages
-
Cartridge Finder
-
Search Result Page
· Click to highlight the radio button for the desired Template layout per page type.
NOTE: At this time, all page types (except Shopping Cart, Checkout Pages and Customer Pages) have three Template layout options: Template A, Template B, and Template C. The Shopping Cart, Checkout Pages and Customer Pages default to Template A only, and cannot be edited due to their unique display and security requirements. To review the layout specifications of Template A, Template B, and Template C, please see section 8.6. Manage Templates.
· After selecting the desired Template layout for each eStore page type, click the “Assign” button. These selections will then comprise the Default Template by Page Type for all existing Resellers.
2) Assign Default Template to Select Reseller(s) – This method utilizes one of the Platform’s previously created “Template Resellers” (Resellers for eStore design purposes only, no selling site; Ids from #1 to #999) and applies the layout, design and content of the Template Reseller to one or more “Regular Resellers” (Resellers with selling eStores; Ids starting from #1000 and up). Utilizing this option will apply both page type layout and content to one or more Regular Resellers on the Platform. To apply a pre-set default Reseller Template in its entirety to one or more Regular Resellers, follow the steps below.
· Click on the “Admin Functions” button and select the “Assign Templates” tab from the left navigation pane.
· From the Assign Templates’ screen, paginate beyond the Template Resellers (Ids from #1 to #999) to the Regular Resellers (Ids starting from #1000 and up). Upon initial Platform delivery, there are 10 default Template Resellers on page 1, and the Regular Reseller listing begins on page 2.
· Click to check the check box(es) adjacent to the Regular Reseller(s) to be assigned the layout, design and content of a default Template Reseller.
· Click on the “Assign Default Template” button.
· This will bring up the “Default Template Layouts” screen.
· Click to highlight the Template Reseller with the preferred pre-determined eStore layout, design and content to be applied to the Regular Reseller(s) selected on the previous screen.
· Click on the “Select Lock Status” drop-down arrow (see image above), and choose the desired “Lock Status” from the below options:
-
No Lock – The Regular Reseller(s) being assigned a default Template will be allowed to modify any component of the layout or content of their eStore(s) – including the Template layout selections per page type, the overall properties, the design, the rows, the cells, the Widget selections and properties, and all Widget content.
-
Partial Lock – The Regular Reseller(s) being assigned a default Template will be able to modify the overall Template properties (background color, image and effects), and will be able to edit the actual content and properties of the pre-selected Widgets placed on the various page types within their eStore layout (i.e. change the image pulled into an Advertising Widget or edit the text in a Dynamic Banner Widget). However, they will not be allowed to swap out the Widgets themselves or to modify the layout of their eStore – not the Template layout selections per page type or the overall design, not the rows or cells, and not the types of Widgets placed in the row cells.
-
Full Lock – The Regular Reseller(s) being assigned a default Template will not be allowed to modify any component of the layout or content of their eStore – not the Template layout selections per page type or the overall properties and design, not the rows or cells, and not the Widget selection, Widget properties, or Widget content.
· After selecting the default Reseller Template to be applied, and determining the preferred Lock Status, click on the “Assign” button at the bottom of the page. This will bring up a confirmation dialog box similar to the below.
· Click the “OK” button to finalize the Template assignment, or click “Cancel” and the assignment will not complete.
· If “OK” is clicked, another pop-up box will display (see example below), and the default Template assignment will be complete.
· To confirm the Template assignment, go to the eStore(s) to which the default Reseller Template was assigned. Note that the layout, design and content of the Template Reseller eStore have been copied over to the Regular Reseller eStore(s) to which they were applied.
3) Assign Templates to a Select Reseller by Page Type – This method determines the Template layout options (including page type layout only; NOT page content) for one select Reseller. More than one Template layout per page type (Template A, Template B, and/or Template C) may be selected here in most cases, and the associated Reseller will be able to determine their preferred layouts from those made available to them (provided that they have the edit permissions). To Assign Templates to a Select Reseller by Page Type, follow the steps below.
· Click on the “Admin Functions” button and select the “Assign Templates” tab from the left navigation pane.
· From the Assign Templates’ screen, paginate beyond the Template Resellers (Ids from #1 to #999) to the Regular Resellers (Ids starting from #1000 and up). Upon initial Platform delivery, there are 10 default Template Resellers on page 1, and the Regular Reseller listing begins on page 2.
· Click to check the check box adjacent to the Regular Reseller to be assigned a Template layout by page type.
· Click on the “Next” button at the bottom of the page. This will bring up the “Select Templates” page which displays the available Template layouts per page type (Template A, Template B, and Template C).
NOTE: The Platform default Template layout selection (by page type) will display a greyed out check box that is not available to deselect from this screen. Any alternate Template options will display with selected (checked) check boxes that are available to deselect from this screen.
· Click on the plus icon to expand the Template layout menu for each eStore page type, including:
-
Home Page
-
Information Pages
-
Category and Sub category
-
Shopping Cart, Checkout Pages
-
Product Pages
-
Customer Pages
-
Cartridge Finder
-
Search Result Page
· Check the box(es) to select additional non-default Template layouts per page type as desired.
NOTE: At this time, all page types (except Shopping Cart, Checkout Pages and Customer Pages) have three Template layout options: Template A, Template B, and Template C. The Shopping Cart, Checkout Pages and Customer Pages default to Template A only, and cannot be edited due to their unique display and security requirements. To review the layout specifications of Template A, Template B, and Template C, please see section 8.6. Manage Templates.
· After selecting the desired Template layout option(s) for each eStore page type, click the “Assign” button. These selections will then comprise the available Template layout options for the selected Reseller.