Reports (Additional BackOffice Functions)
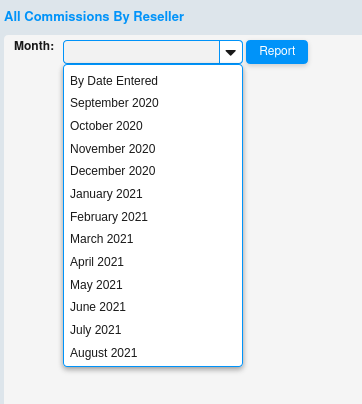
All Commissions by Reseller
The “All Commissions by Reseller” report displays the commissions paid or owed to each Reseller for the time period searched. The report also itemizes the number of sales per Reseller, the dollar amount of total sales per Reseller, the total fees (commissions) earned per Reseller, the commission dollar amount paid automatically, and the commission dollar amount paid manually.
Please keep in mind that a commission may not be paid automatically for a number of reasons: if the Platform Administrator prefers to distribute commissions by alternate means, if the Reseller’s merchant account information is incorrect or incomplete, if the Reseller does not have a merchant account setup, or if the applicable merchant account is set to “Inactive.”
Creating the All Commissions by Reseller Report
-
Click the “Reports” button and select the “All Commissions by Reseller” tab from the left navigation pane.
-
Click the drop-down arrow to display the date ranges available.
-
Select a month/year combination from the drop-down menu provided, or determine your own date range by selecting, “By Date Entered.”
-
If “By Date Entered” is selected, specify the Starting Date and Ending Date for the report.
-
Click the “Report” button to generate the report for the selected date range.
All Trans. Fees by Vendor
The “All Transaction Fees by Vendor” report is for future development, and is not functional at this time.
Reseller Billing
Click on the “Reports” button and select the “Reseller Billing” tab from the left navigation pane. This report displays the number of Active Resellers, Inactive Resellers and Total Resellers overall (including Active and Inactive) for each day of the date range selected. Depending on the Agreements in place and the fee structure per active eStore, Platform Management can reference this report to confirm anticipated receipts from Reseller Billing as well as dollars due to eComNow.
Creating the Reseller Billing Report
-
Click the “Reports” button and select the “Reseller Billing” tab from the left navigation pane.
-
Click the drop-down arrow to display the date ranges available.
-
Select a month/year combination from the drop-down menu provided, or determine your own date range by selecting, “By Date Entered.”
-
If “By Date Entered” is selected, specify the Starting Date and Ending Date for the report.
-
Click the “Report” button to generate the report for the selected date range.
Sales Tax Report
The “Sales Tax Report” is generated based on the applicable payment merchant account. If the Platform maintains a merchant account that accepts full payment for all or some of the eStore orders, then this report is applicable. In this scenario, the merchant account configuration for the Platform can be either “Platform Only” or “Reseller and Platform.” However, if the merchant account setup is for “Reseller Only,” then this report will not be applicable on the Platform level.
Creating a Sales Tax Report
-
Click the “Reports” button and select the “Sales Tax Report” tab from the left navigation pane.
-
Select a time period from the drop down menu or select By Date Entered to enter your own start and end dates.
-
Select a payment merchant account using the drop down box.
-
Click the “Report” button to view the results.
The Sales Tax Report is broken down by State, County, City and Zip Code, and sub-totals and grand totals are calculated using the same breakdown. The date range for the report displays in the top left corner
To download the Sales Tax Report in either a PDF or CSV file format, click the dropdown arrow in the “Choose File Type” field. Select the preferred file format (PDF or CSV) and click the “Download Report” button. You will be prompted to open or save the report in an appropriate application.
Order Charge Audit
Click on the “Reports” button and select the “Order Charge Audit” tab from the left navigation pane. This report records all credit card transactions processed on the Platform (see sample report below).
Order Charge Audit Report - Primary Fields
-
Action – Indicates the exact transaction type addressed in the record, for example:
-
Authorization – When the customer initially submits an order successfully, the Authorization for the purchase dollar amount completes. This places the associated funds on credit hold until the transaction is either finalized via capture, or the credit hold expires (usually 30 days later)
-
Capture – When a Vendor closes their portion of an order, the associated funds are captured and the charge is finalized on the customer credit card.
-
Split for Commission – If the associated Reseller has an active merchant account and their commission is being paid automatically via Split Pay, this transaction debits the commission dollars from the primary merchant account accepting full payment for the entire order (Platform merchant account), and credits these dollars to the appropriate Reseller merchant account.
-
-
Notes – Indicate if the Action succeeded or not, and if it failed, a brief reason is noted (i.e. “User not authenticated” or “Credit card declined”).
-
From Acct – Denotes the merchant account from which the funds are debiting (if any). For example, in the case of a Split Pay commission, the commission dollars debit from the Platform merchant account and credit to the Reseller merchant account.
-
To Acct – Denotes the merchant account to which the funds are crediting. For example, if the Platform merchant account is accepting full payment for the purchase, the original authorization and capture will credit to the Platform merchant account. However, if the Reseller merchant account is accepting full payment for the purchase, the original authorization and capture will credit to the Reseller merchant account instead.
Audit Log Report
Click on the “Reports” button and select the “Audit Log Report” tab from the left navigation pane. This report records all user activity on the Platform. It logs the User Id (email address), what entity the User is Editing On, the Area and Sub-area being modified, the Change Type, and the Date the change was implemented (see sample report screen below). This data is helpful to isolate who made what desirable or undesirable changes and when.
ACH Reports
Click on the “Reports” button and select the “ACH Reports” tab from the left navigation pane. These reports apply to any Platform that utilizes ACH payment processing for Vendors and/or Resellers. If the Platform is setup with an ACH-capable merchant account to accept full payment for any or all eStore sales, the Platform Vendors may opt to be paid automatically via ACH for cost of goods plus shipping and handling, and the Platform Resellers may opt to be paid commissions via ACH. To qualify for ACH payments, the Reseller or Vendor simply needs to setup a bank account to accept the payment transactions. In most cases, the ACH transactions will be payment credits; however, on occasion, the Reseller or Vendor bank accounts will be debited as well (i.e. following a merchandise return).
Build ACH Batch
Click on the “Reports” button. From the left navigation pane, select the “ACH Reports” tab and then the “Build ACH Batch” sub-tab. Select from the drop-down menu to “Group By” Reseller or Vendor. Choose a “Cutoff Date” from the drop-down calendar (can be any date prior to the date of the report).

Click the “Report” button to build the ACH batch. The initial screen of a sample Reseller ACH Batch Report is shown below.
Click on the plus icon to expand the batch records (see expanded Reseller and Vendor batch report samples below). When expanded, each associated order number will be itemized per entity (Reseller or Vendor), along with the total dollars due. Additionally, an “Adjustment” field displays below the order listing associated with each Reseller and Vendor.
Note that all outstanding “unbatched” orders will be selected (checked) by default. The Platform Administrator determines which Resellers and/or Vendors will be paid and for which orders by checking the boxes adjacent to the orders to be included in the ACH Batch, and unchecking the boxes next to orders that should not be included in the Batch. To select or deselect all orders on the report, check or uncheck the check box in the top header. This will toggle back and forth between “all orders selected” vs. “all order deselected.”
Lastly, if any dollar adjustments need to be made (i.e. debits for a product return), enter the amount to be adjusted into the “Adjustment” text field. The format for an adjustment credit is the numeric dollars and cents only, with no dollar sign (i.e. 17.28), and the format for an adjustment debit is the numeric dollars and cents preceded by a minus (-) sign (i.e. -3.15).
After selecting which orders are to be included in the ACH Batch, and entering any adjustment dollar amounts as necessary, click the “Save Batch” button. The ACH Report screen will then collapse, and when you pull up the next ACH Batch Report, the orders that were saved in a previous batch will no longer be available to select.
By Batch
Click on the “Reports” button. From the left navigation pane, select the “ACH Reports” tab and then the “By Batch” sub-tab. See initial report screen below.
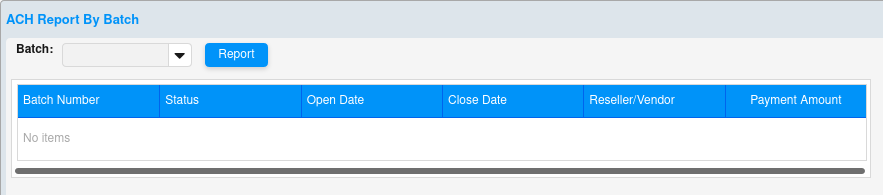
ACH Report by Batch - Field Definitions
Batch Number – System generated identification number when the ACH Batch is originally run.
Status – Indicator if the batch is “Open” (fund transfer not yet complete), or “Closed” (fund transfer complete).
Open Date – Date the batch was originally run.
Close Date – Date the batch completed, and funds transferred from and to the appropriate bank accounts.
Reseller/Vendor – The entity to which the ACH funds are being transferred.
Payment Amount – Dollar amount of funds being transferred.
Report Options by Batch
From the “Batch” drop-down menu, select “By Batch ID” or “By Date Range.”
-
If “By Batch Id” is selected, enter the “Start ID” and the “End ID” into the designated fields, and click the “Report” button. The details regarding the ACH batches meeting the selected and entered criteria will display in the report table.
-
If “By Date Range” is selected, click the calendar icons to select “Start Date” and “End Date” and click the “Report” button. The details regarding the ACH batches meeting the selected and entered criteria will display in the report table.
Custom Reports
Click on the “Reports” button and select the “Custom Reports” tab. Utilizing varied criteria, customized sales and order-related reports can be generated in this section. Reports can be built around four basic parameters – By Orders, By Customers, By Vendors, and By Resellers.
All reports may be downloaded as a CSV (Comma Separated Value) file by clicking the “Download CSV File” button. Custom Reports may also have options for different CSV outputs: Order Summary or Item Detail (defined below).
Order Summary CSV provides totals for an order with one record (row) per order. Use this report to look at overall sales, sales by date, average order size, or other parameters based on the total order.
Item Detail CSV displays all product charges by item with all related tax and commission fees broken down as well. Use this report for in-depth analysis of sales of specific items, most purchased products, shipping charge comparisons, and other comprehensive analyses.
By Orders
Click the “Reports” button. From the left navigation pane, select the “Custom Reports” tab and then the “By Orders” sub-tab.
-
Click in the “Start Date” field, and then in the “End Date” field. Each date field has a calendar icon and automatically displays a drop-down calendar when clicked. Navigate to and select the desired Start Date and End Date respectively. Your selected dates will populate these fields upon selection.
-
Enter an “Order Nr” (Number) to search by a specific order, or leave this field blank to pull up all orders for the selected time period.
-
Click the “Order Status” drop-down arrow, and select either Open orders, Closed orders, or let it default to View All orders (which includes both Open and Closed orders).
-
Click the “Report” button, and all orders meeting the entered and selected criteria will populate the report screen. See sample below. If the orders display on multiple pages, utilize the pagination field and arrow icons that display at the bottom of the list.
-
Click on any order number hyperlink to view the associated order details
Download CSV File
Select the preferred “CSV file output” (Order Summary or Item Detail) and click the “Download CSV File” button. This will pull up all orders meeting the selected and entered criteria into a CSV spreadsheet file. You will be prompted to open the file in a spreadsheet program such as Excel.
Click the “Print” button to print the current page of listed orders displaying within the report screen. This will bring up your print dialog box to proceed with printing the order list.
By Customers
Click on the “Reports” button. Select the “Custom Reports” tab and then the “By Customers” sub-tab.
-
Click in the “Start Date” field, and then in the “End Date” field. Each date field has a calendar icon and automatically displays a drop-down calendar when clicked. Navigate to and select the desired Start Date and End Date respectively. Your selected dates will populate these fields upon selection.
-
Enter value(s) into the available fields (Name, Address, State, City, Zip, Email, and/or Phone) as desired to refine your order search criteria.
-
Click the “Order Status” drop-down arrow, and select either Open orders, Closed orders, or let it default to View All orders (which includes both Open and Closed orders).
-
Click the “Report” button, and all orders meeting the entered and selected criteria will populate the report screen. See sample below. If the orders display on multiple pages, utilize the pagination field and arrow icons that display at the bottom of the list.
-
Click on any order number hyperlink to view the associated order details.
Download CSV File
-
Chose CSV file output – Select from two available formats:
-
Order Summary – abbreviated order itemization
-
Item Detail – detailed order breakdown by each individual item, including all associated fields
-
-
Click the “Download CSV File” button to pull up all orders meeting the selected and entered criteria into a CSV spreadsheet file. You will be prompted to open the file in a spreadsheet program such as Excel.
Click the “Print” button to print the current page of listed orders displaying within the report screen. This will bring up your print dialog box to proceed with printing the order list.
By Vendors
Click the “Reports” button. From the left navigation pane, select the “Custom Reports” tab and then the “By Vendors” sub-tab.
-
Click in the “Start Date” field, and then in the “End Date” field. Each date field has a calendar icon and automatically displays a drop-down calendar when clicked. Navigate to and select the desired Start Date and End Date respectively. Your selected dates will populate these fields upon selection.
-
Enter a “Vendor Nr” (Number) if reporting for a specific Vendor, or leave this field blank to pull up all orders for the selected time period.
-
Click the “Order Status” drop-down arrow, and select either Open orders, Closed orders, or let it default to View All orders (which includes both Open and Closed orders).
-
Click the “Report” button, and all orders meeting the entered and selected criteria will populate the report screen. See sample below. If the orders display on multiple pages, utilize the pagination field and arrow icons that display at the bottom of the list.
-
Click on any order number hyperlink to view the associated order details.
Download CSV File
Click the “Download CSV File” button to pull up all orders meeting the selected and entered criteria into a CSV spreadsheet file. You will be prompted to open the file in a spreadsheet program such as Excel.
Click the “Print” button to print the current page of listed orders displaying within the report screen. This will bring up your print dialog box to proceed with printing the order list.
By Resellers
Click the “Reports” button. From the left navigation pane, select the “Custom Reports” tab and then the “By Resellers” sub-tab.
-
Click in the “Start Date” field, and then in the “End Date” field. Each date field has a calendar icon and automatically displays a drop-down calendar when clicked. Navigate to and select the desired Start Date and End Date respectively. Your selected dates will populate these fields upon selection.
-
Enter a “Reseller Nr” (Number) if reporting for a specific Reseller, or leave this field blank to pull up all orders for the selected time period.
-
Click the “Order Status” drop-down arrow, and select either Open orders, Closed orders, or let it default to View All orders (which includes both Open and Closed orders).
-
Click the “Report” button, and all orders meeting the entered and selected criteria will populate the report screen. See sample below. If the orders display on multiple pages, utilize the pagination field and arrow icons that display at the bottom of the list.
-
Click on any order number hyperlink to view the associated order details.
Download CSV File
Select the preferred “CSV file output” (Order Summary or Item Detail) and click the “Download CSV File” button. This will pull up all orders meeting the selected and entered criteria into a CSV spreadsheet file. You will be prompted to open the file in a spreadsheet program such as Excel.
Click the “Print” button to print the current page of listed orders displaying within the report screen. This will bring up your print dialog box to proceed with printing the order list.