Admin Functions
Reseller Functions
Edit Reseller Profile
Click the “Admin Functions” button. Select the “Reseller Functions” tab and then the “Edit Reseller Profile” sub-tab.
The Reseller Profile is divided into four tabs:
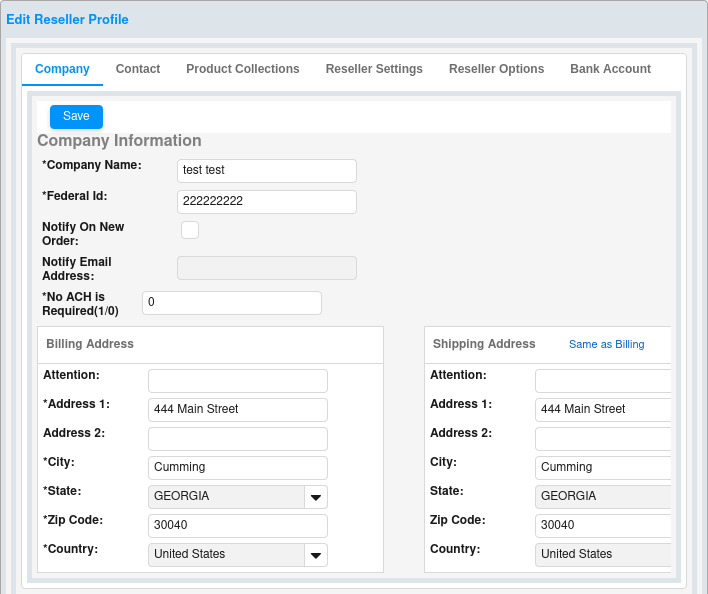
1) Company – Basic Company information is entered and/or edited here – Company Name, Federal Id, Billing Address and Shipping Address. Additionally, if you wish to be notified of new orders placed on your eStore, check the “Notify On New Order” box, and enter the appropriate email address into the “Notify Email Address” field. Required fields are marked with an asterisk (*). See image below.
When the data entries are complete to your satisfaction, click the “Save” button, and you will automatically progress to the “Contact” tab.
2) Contact – Reseller Contact information is entered and/or edited here. Platform Management will reference this profile tab when they need to contact the Reseller for any reason (i.e. new eStore features). A primary and secondary Reseller representative may be entered. Required fields are marked with an asterisk (*).
When the data entries are complete to your satisfaction, click the “Save” button.
3) Reseller Settings – There are four optional settings available on this page.
· Reseller Domain – If allowed by the Platform Administrator, you may opt to customize your Reseller Domain for all non-secure eStore pages. There is frequently an additional cost associated with this feature; contact your Platform Administrator for more details. If you choose to utilize the custom Reseller Domain feature, enter the desired URL (web address) here (i.e. www.cscestorexpress.com). When custom Reseller Domain setup is complete, click the “Check to Activate” box.
· Reseller Subdomain – If allowed by the Platform Administrator, you may opt to customize your Reseller Subdomain for all non-secure and/or secure eStore pages. There is frequently an additional cost associated with this feature; contact your Platform Administrator for more details. If you choose to utilize the custom Reseller Subdomain feature, enter the desired Subdomain name here (i.e. cscestorexpress). When custom Reseller Subdomain setup is complete, click the “Check to Activate” box.
· Google Analytics Id – The functionality providing Platform integration with Google Analytics is currently being enhanced, and will be accessed in the “Information Page” areas going forward. This field can be left blank for now, and may be removed in the near future.
· Ship to Store – If you wish to offer an option to ship customer orders to your physical store address, check the “Allow reseller to ship to store address” box. In order to activate the “Ship to Store” feature, you must have a “Shipping Address” entered on the “Company” tab of your Reseller Profile, located at Admin Functions -> Reseller Functions -> Edit Reseller Profile -> Company Tab -> Shipping Address.
When the data entries are complete to your satisfaction, click the “Save” button.
4) Bank Account – If the Platform Administrator provides the option for the Reseller to be paid commissions via ACH transactions to a select bank account, click on the “Bank Account” tab to enter your banking information.
Enter the bank account’s “Routing Number” and “Account Number” into the designated fields, and click the “Submit for Tokenization” button.
A confirmation dialog box will display indicating that the “Account has been Tokenized.”
Click the “OK” button and the entered number values will be masked, with only the last 4 digits of each displaying on the “Bank Account” tab.
Lastly, click the “Save” button. Once this Bank Account information is saved, any deposits and/or debits transacted by platform sales activity will hit this associated account automatically via the ACH process.
Edit Reseller Shipping Cost
The “Edit Shipping Cost” functionality allows the Reseller to setup shipping rules that can override the individual items’ shipping settings under certain conditions. Keep in mind which entity (you, the Reseller, or the Platform) owns the applicable payment merchant account when setting up any shipping cost rules, as Vendors generally pass along the actual shipping costs to whoever is being invoiced for “cost of goods.”
NOTE: Only items shipped via Calculated or Free methods will factor into the required shipping rule minimums. Items shipped via the Fixed method will not factor into any shipping rules.
For example, in the below screen shot, the Reseller has setup one shipping rule for each shipping speed – Ground, 2nd Day, and Next Day respectively.
If the customer selects Ground, and the order total is $100(+), then the shipping cost associated with this order will be $0.00. If the customer selects 2nd Day, and the order total is $200(+), then the shipping cost associated with this order will be $10.00. And lastly, if the customer selects Next Day, and the order total is $200(+), then the shipping cost associated with this order will be $15.00.
Edit Shipping Cost – Field Definitions
Id – System generated “Id” number identifying the specific shipping rule. This Id cannot be edited.
ResellerId – System generated Reseller number identifying the logged-in Reseller setting up or modifying the shipping rule. This Reseller Id cannot be edited.
Shipping Type – The Shipping speed to which the rule applies. This field value can be edited.
Minimum Price – The required minimum total dollar amount for an order to make the shipping rule kick in.
Shipping Cost – The cost associated with shipping a package which meets the designated Shipping Type and Minimum Price criteria.
Adding a Shipping Rule
To add a Shipping Rule, click the “Add” button to bring up the “Add Shipping Cost” box.
Simply make your desired entries for both the Minimum Price and the associated Shipping Cost for an order. Then, select the Shipping Type (speed) from the drop-down box – Next Day, 2nd Day or Ground.
When satisfied with your entries and selections, click the “Save” button. The new Shipping Rule will be added to the list.
Deleting a Shipping Rule
To delete a Shipping Rule, click on the Shipping Rule entry to be deleted and click the “Delete” button. A confirmation dialog box will display indicating, “Shipping Cost info deleted successfully.”
Click the “OK” button on this pop-up box, and the deleted Shipping Rule will be removed from the list.
Editing a Shipping Rule
Click on the “edit” hyperlink in the far right-hand column of the Shipping Rule to be edited. This will bring up the “Edit Shipping Cost” pop-up box. See image below.
Make the desired edits to one or more of the available fields and click the “Save” button to retain the modified Shipping Rule.
Add Custom Vendor
To add a Custom Vendor, if allowed by the Platform Administrator, click the “Admin Functions” button and select the “Add Custom Vendor” tab in the left navigation pane. A Custom Vendor’s products will automatically be filtered to your eStore only, and will not be available for display or sale on any other store.
The Custom Vendor Profile is divided into three tabs – Company, Contact, and Shipping. The Contact and Shipping tabs will become enabled once the Company information is saved.
1) Company – Basic Company information is entered and/or edited here – Company Name, Federal Id, Billing Address and Shipping Address. Required fields are marked with an asterisk (*).
When the data entries are complete to your satisfaction, click the “Save” button, and you will automatically progress to the “Contact” tab.
2) Contact – Custom Vendor Contact information is entered and/or edited here. Platform Management will reference this profile tab if they need to contact the Custom Vendor for any reason, so please keep the data current. A primary and secondary Custom Vendor representative may be entered. Required fields are marked with an asterisk (*).
If the Custom Vendor prefers to be notified by email each time a new order is placed on the platform, select “Yes” for “Email Notification of new Orders,” and enter the email address to which the notification should deliver into the “Email Address for new Orders” field.
If the Custom Vendor prefers instead to not receive these notifications, then select “No” for this setting. Scenarios when this option may work best include Vendors receiving very large order quantities, or those who have opted to process orders automatically (i.e. via EDI fulfillment).
When the data entries are complete to your satisfaction, click the “Save” button, and you will automatically progress to the “Shipping” tab.
3) Shipping – There are three settings available on this page.
· Shipping Account Id – This field is for future development. Ignore for now.
· Average Shipping Zone – Click the drop-down arrow and select the “Average Shipping Zone” for the Custom Vendor account. This zone will be referenced for all packages shipped via the Calculated shipping type. The Custom Vendor zone and the package weight are considered when figuring Calculated shipping cost.
Rack rates for UPS zones 2 thru 8 are loaded to all platforms by default. Additionally, the Platform Administrator and/or the Vendor may upload customized rate charts as well. All zones available to each Custom Vendor account will display in the “Average Shipping Zone” drop-down menu.
· Shipping Method – This setting determines the Custom Vendor’s default “Shipping Method” (or speed). This method will be available for all items ordered from this Vendor’s inventory, and cannot be deleted as an option; however, it does not preclude the Vendor from offering alternative shipping methods. In most cases, the preferred default Shipping Method is “Ground” and the Vendor may opt to offer 2-Day and 1-Day speeds as well. If the Custom Vendor prefers to change their default Shipping Method, they may select “2Day Shipping” or “1Day Shipping” on this screen.
When the data entries are complete to your satisfaction, click the “Save” button.