Manage Platform
Manage Reseller Groups
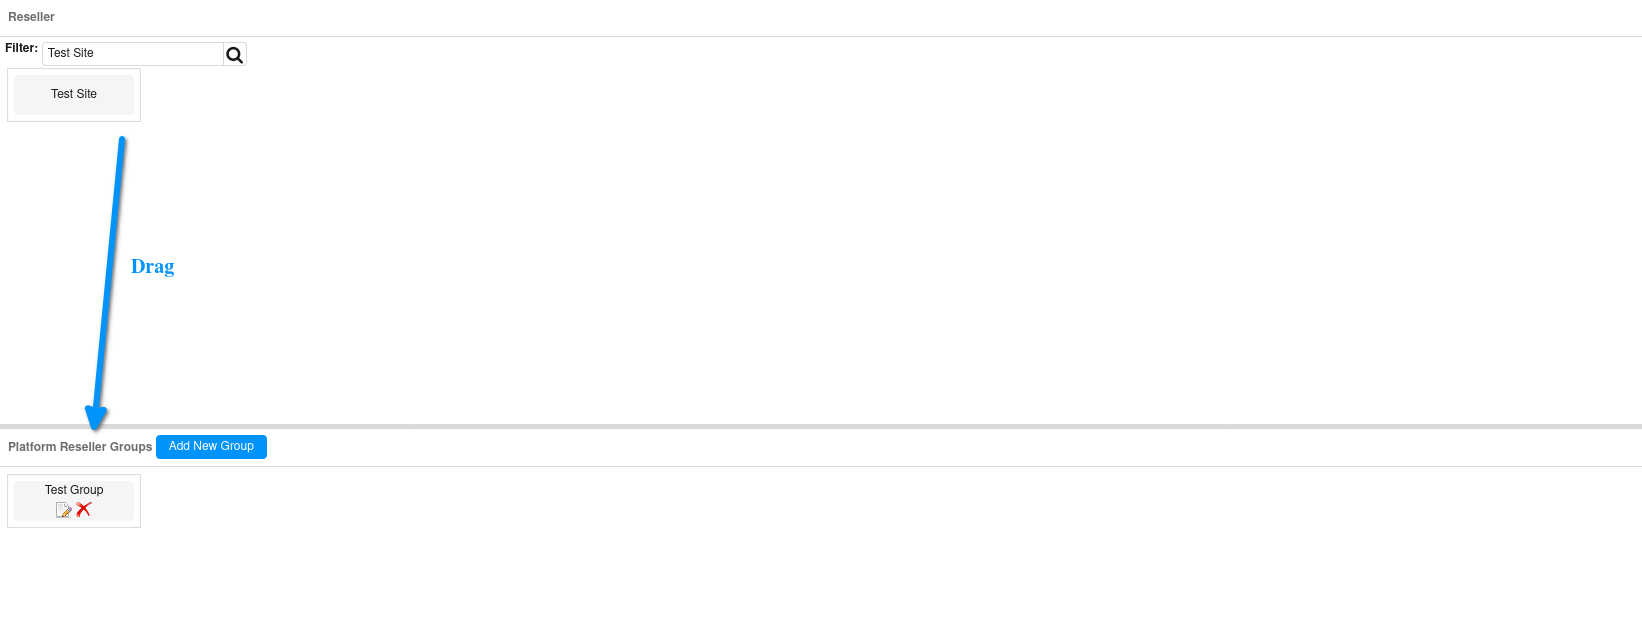
Click on the “Manage Platform” button, and select the “Manage Reseller Groups” tab. In the top pane, the current Resellers will be listed. In the bottom pane, Reseller Groups can be created. See image below.
This functionality is helpful if the Platform Management needs to segment products so that some Vendor inventories are only available to specific groups of Resellers or to individual Resellers.

Creating a New Reseller Group
Click on the “Add New Group” button to bring up the “Add Group” box (see below). Enter the Name for the new Reseller Group (i.e. “Specialty”) into this field and click “Save.” A box labeled with the new Reseller Group name will then display in the bottom “Platform Reseller Groups” pane.
Drag and drop Reseller boxes from the top pane to the newly setup Reseller Group box in the bottom pane.
Or, as a second option for managing Resellers in a Reseller Group, click on the edit icon in the Reseller Group box in the bottom pane. This will bring up the “Edit Group” screen. Two panes display on this screen. All current Resellers are listed in the right-hand “Select From” pane. Resellers selected to be in the Reseller Group should be dragged and dropped into the left-hand “Select In” pane. See image below.
To edit the Reseller Group Name, click the “Group Name” hyperlink (i.e. Specialty) at the top of the “Edit Group” box. This will bring up a text box in which the Reseller Group Name can be edited. Edit the name as desired. Click the “Save” button to keep the new Reseller Group Name. Click the “Cancel” button if you do not want to save the new name.
When finished dragging and dropping the desired Resellers into the left-hand pane and saving the desired Group Name, close the “Edit Group” box.
Hover over the newly created Reseller Group box to display a drop-down list of the Resellers included in the group. See example “Specialty” Reseller Group list below.
To delete a Reseller from the Reseller Group, click the icon in the “Delete” column of the Reseller Group list.
Deleting a Reseller Group
To delete an entire Reseller Group from those available on the Platform, click the delete icon in the Reseller Group box for the one to be deleted. The deleted Reseller Group will immediately be removed from the “Platform Reseller Groups” itemized in the bottom pane of the “Manage Reseller Groups” page.
Platform Categories
Click on the “Manage Platform” button, and select the “Platform Categories” tab from the left navigation pane. All categories and subcategories for the Platform are setup and managed here.
Platform Category Views
-
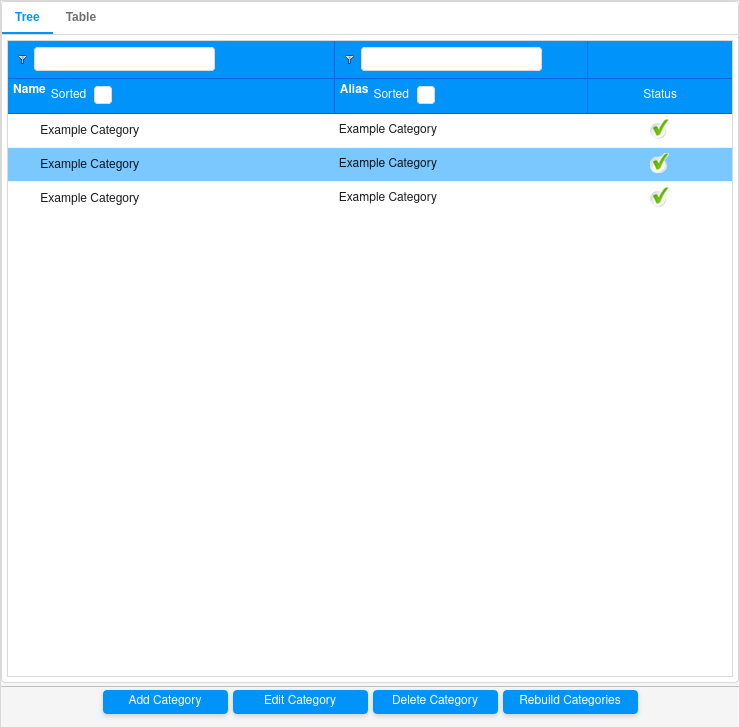
Category Tree – The default view (tab) upon initially navigating to the “Platform Categories” page is the category “Tree.” This view displays all categories and subcategories in an outline format, and lists each associated category Alias as well as its Active/Inactive Status. The main and/or “parent” categories are listed in the order that they will render on store within the navigation bar or panel.
-
Expanding and Collapsing – An expansion arrow displays to the left of any main category that is parent to one or more subcategories – i.e. child, grandchild, etc. Clicking an expansion arrow will reveal the subcategory level(s) beneath the parent category. Clicking the arrow again will toggle back to the original view with the subcategories collapsed under the parent. This toggling back and forth between expanded and collapsed views is applicable throughout all levels of the Category Tree.
-
Filtering – To search the Category Tree, enter all or part of the category or subcategory Name or Alias into the filter field (labeled with an icon) above the respective column header. Keep in mind that if you are filtering out a subcategory, the query results will bring up the entire category branch(es) under which the subcategory is listed. If this is the case, you will need to navigate thru the subcategory levels (via the expansion arrows) to reveal the specific subcategory(ies) being searched.
-
Sorting – To sort the Platform Category list alphabetically by Name or by Alias, check the box to the right of the appropriate column header.
-
-
Category Table – The second view (tab) available on the “Platform Categories” page is the category “Table.” This view displays all categories and subcategories in a table format. The Table itemizes category Name, Alias, and Id only, and does not include any reference to category placement (or level) within the category tree.
- Filtering – To search the Category Table, enter all or part of the category or subcategory Name, Alias or Id into the filter field (labeled with an icon) above the respective column header. The filter query results will bring up all categories or subcategories meeting the entered criteria.
Platform Category Field Definitions
-
Name – The category or subcategory name as it will display on the eStore (i.e. Fitness Products or Topical Spray).
-
Alias – The code assigned to each category or subcategory setup on the Platform; must be alpha-numeric and cannot contain spaces (i.e. Fitness_Products or 2549). This code is referenced when configuring inventory data files for automatic upload. Category aliases must be unique, though category/subcategory names may be duplicated. For example, duplicate “Accessories” category names may co-exist (i.e. Jewelry -> Accessories and Computers -> Accessories); however, their category aliases must be unique (i.e. JewelryAccessories and ComputerAccessories).
-
Status – A green check mark indicates “Active” status, and a red “X” mark indicates “Inactive” status. If a Platform Category is Active, it will be available to all Resellers (to whom it is filtered) to select or deselect for display on their eStore. On the other hand, if a Platform Category is Inactive, it will not be available to display on any eStore.
-
Id – Unique, system-generated number identifying the specific category or subcategory. This Id is referenced in direct URLs, hyperlink formulas, etc. The Id number increments chronologically as new categories are setup on the Platform, and it cannot be edited.
Platform Category Functions
Add Category – Click the “Add Category” button at the bottom of the Category Tree. Or, if you want to add a subcategory (child, grandchild, etc.), first click to highlight its parent category, and then click the “Add Category” button. This will bring up a pane on the right side of the screen where the properties of the new category can be setup. This pane contains three tabs:
-
Basic Info
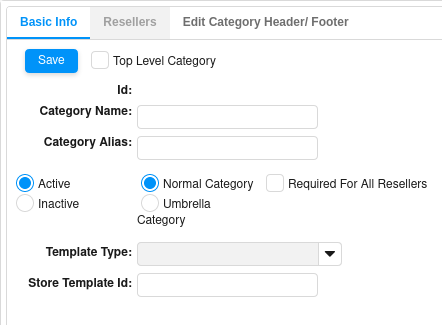
Each new category is initially created on the “Basic Info” tab, where its basic settings are determined. See options pictured and described below.
-
Check the “Top Level Category” box if the new category is to be setup as a main parent category. Leave this box unchecked if the new category will be setup as a subcategory on any level – child, grandchild, etc.
-
Enter the “Category Name” as it should display on store (i.e. Fitness Products).
-
Enter the “Category Alias” into the designated field. Keep in mind that all category aliases must be unique and cannot contain any spaces (i.e. Fitness_Products).
-
Select a status of “Active” or “Inactive.” Remember that an Inactive category will not be available to display on any Platform eStore.
-
Select “Normal Category” for the category to display on store at the category/subcategory level at which it was originally setup within the category tree.
-
Select “Umbrella Category” if you need to segment or restructure the category tree under certain conditions, and do not want the new category to actually display on store. For example, if the category structure needs to vary by Reseller type (i.e. Specialty vs. Discounter), then “Specialty” and “Discounter” could be setup as Umbrella parent categories, and a unique category structure could be setup under each Umbrella. In this scenario, each Umbrella category would not display on store at all. Instead, each category and subcategory setup underneath an Umbrella category would move up a level, and would display on store as though the Umbrella category did not exist.
-
Check the “Required For All Resellers” box if the new category must display on all Platform eStores by default, without the option for any Reseller to deactivate it. Leave this box unchecked to give each Reseller the option to activate or deactivate the category according to their preferences.
-
Select the “Template Type” from the drop-down menu:
-
Category Template – The most widely used format whereby categories are setup in an outline format, with parent categories displaying in the navigation bar or panel, and multiple levels of subcategories (child, grandchild, etc.) displaying as fly-outs underneath their respective parents.
-
Printer Lookup Template – Format exclusive to the ink and toner industry. This template type brings up a special “Cartridge Finder” page layout whereby products can be searched by Manufacturer, Series and Model; by Cartridge; or by Printer.
-
-
-
Resellers
On the “Resellers” tab, select the Reseller Group (or Groups) to which the newly created category should be filtered. The default filter is “All Resellers,” meaning that the category will be available to display on all Platform eStores. If, however, you prefer to filter the category to specific Resellers, then one or more of the alternate Reseller Groups may be selected (see example below). Each alternate Reseller Group is created by Platform management, and is a subset of “All Resellers.” Therefore, “All Resellers” cannot be selected along with any other alternate Reseller Group, as these are contradictory settings.
After confirming your Reseller Group selection(s), click “Save” to apply the Reseller category filter. If alternate Reseller Groups are not saved here, the filter setting will revert back to the default selection of “All Resellers.”
-
Edit Category Header/Footer
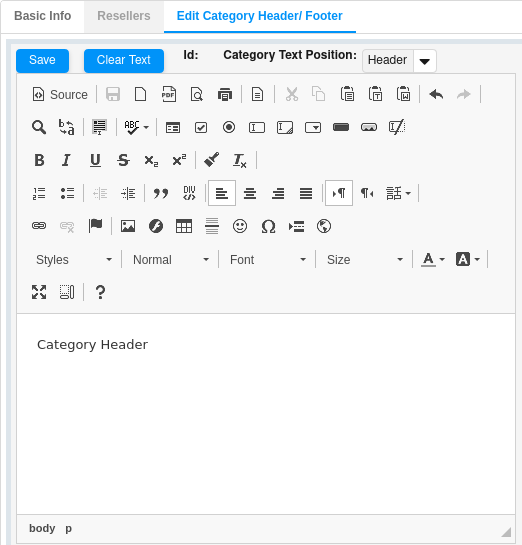
On the “Edit Category Header/Footer” tab, a header and/or footer can be setup (as desired) for each category or subcategory page displayed on store. See the steps outlined below.
-
From the “Category Text Position” drop-down menu, select either the “Header” or the “Footer.”
-
Enter your desired content into the text box area, utilizing the extensive tool bar menu for customized formatting.
-
For even more advanced formatting options, click the “Source” button to change the edit view to the HTML source code. The Category Header/Footer editor is fully HTML capable. Use the source code window to customize your text, background and layout. Pull in images, flash files, videos, etc. as desired.
-
To view how the entered code will display on store, simply click the “Source” button again. This button will toggle the edit view from the source code back to the normal display mode, and vice versa.
-
Edit Category - Click to highlight the category or subcategory to be edited, and then click the “Edit Category” button. This will bring up a pane on the right side of the screen where the properties of the select category/subcategory can be modified. See "Add Category" above for detailed steps.
Delete Category – On either the category Tree or Table, highlight the category or subcategory to be deleted, and click the “Delete Category” button at the bottom of the category list. A pop-up box will display to confirm the deletion (see below). Click “Yes” to delete the highlighted category, or click “No” to retain it.
Rebuild Categories – Following several scenarios (itemized below) a category rebuild is required in order to make the correct category selection menu available to the various Resellers and Reseller Groups, and to display the proper categories on all Platform eStores. To do this, simply click the “Rebuild Categories” button at the bottom of the “Platform Categories” page.
- Inventory added or deleted
- Inventory activated or deactivated
- Vendor account added, activated or deactivated
- Vendor account filter added or edited
- Inventory filter added or edited
- Category filter added or edited
- Category or subcategory added, deleted, activated or deactivated
- Inventory items grouped or ungrouped
Platform Setup
Click on the “Manage Platform” button and select the “Platform Setup” tab from the left navigation pane. This page provides a central control panel for the settings that impact the Platform as a whole. See below screen shots and field definitions.
Account Type
Merchant Account Type – There are three options available regarding the Platform merchant account configuration:
-
Platform Only – The Platform owns the only active merchant account. In this case, the Platform receives full payment for all eStore sales, and remits cost of goods plus shipping and handling to the appropriate Vendors, pays sales commissions to the respective Resellers, and distributes all sales taxes as necessary.
-
Reseller Only – Each Reseller owns an individual merchant account associated with his or her eStore only. In this case, the Reseller receives full payment for all sales on his or her eStore, and remits payment to the Platform to cover cost of goods, shipping and handling, and Platform margin. Given this setup, the Reseller is responsible for all related sales tax distributions as well.
-
Reseller and Platform – The Platform maintains the primary merchant account, but allows some Resellers to setup individual accounts specific to their eStore. In this case, the Platform receives full payment for some eStore sales, and (for these sales) remits cost of goods plus shipping and handling to the appropriate Vendors, pays sales commissions to the respective Resellers, and distributes the associated sales taxes as necessary. However, for the Resellers who opt to maintain their own merchant account, they will receive full payment for all sales on their respective eStores. These Resellers must remit payment to the Platform to cover cost of goods, shipping and handling, and Platform margin, as well as distribute all related sales taxes.
Help Files
Each of the fields in the “Help Files” section will be populated with the correct default values upon Platform delivery. Please do not modify or delete these values.
Email Overrides
The “Email Overrides” section is used primarily for back-up documentation, testing and trouble-shooting purposes, as needed. These fields will either be populated with the correct default values or left blank upon Platform delivery. Please do not modify or delete these values.
Image Location
Fields in the “Image Location” section will be populated with the correct image directory URLs upon Platform delivery. Please do not modify or delete these values.
Downloads Location
Fields in the “Downloads Location” section will be populated with the correct download directory URLs upon Platform delivery. Please do not modify or delete these values.
Global Setup
Google Analytics Id – The functionality providing Platform integration with Google Analytics is currently being enhanced, and will be accessed in the “Information Page” areas going forward. This field can be left blank for now, and may be removed in the near future.
Strikeiron Tax – This field will be populated with the appropriate Tax Id for the Platform to properly integrate with the third party sales tax application. This functionality assures that all applicable sales taxes will be automatically calculated per order in real time. Please do not modify or delete this value.
Strikeiron Address – For future development. Please leave blank for now.
Strikeiron Zip – For future development. Please leave blank for now.
Special Codes
Ajax API Code – This field is normally left blank. However, if your Platform is utilizing the Admin APIs, then enter the Platform identifier for those APIs here. See the API documentation for more information.
System URLs
The values entered into these fields are of particular importance if any Resellers to the Platform will be utilizing the custom Reseller Domain or Reseller Subdomain functionality.
-
Platform Domain with www – Enter the Platform URL in the format shown below, including the “www” or subdomain (i.e. www.cscestorexpress.com or shop.cscestorexpress.com).
-
Platform URL without Subdomain – Enter the Platform URL in the format shown below, NOT including the “www” or subdomain (i.e. cscestorexpress.com).
-
CName in DNS – Enter the complete Platform CName exactly as it appears in the DNS record (i.e. 34091204812039812.us-east-1.elb.amazonaws.com).
Reseller Options
The values entered into these fields will determine whether or not certain features and functionalities are available to the Platform Reseller base.
Are resellers allowed to have custom vendors? – Check this box to allow custom Vendors, and do not check it to disallow custom Vendors. A custom Vendor is a supplier (setup by a Reseller) to provide inventory for sale on that individual Reseller’s eStore only.
-
Should the reseller be allowed to override Ads? – Possible future development. Leave blank for now. Not used at this time.
-
When creating a new reseller, how should it setup default categories? – Select a method from the adjacent drop-down menu.
-
Automatic – All currently active Platform categories will be activated automatically with each newly created eStore.
-
Manual – No Product categories will be activated automatically. Instead, all product categories will need to be activated manually for each newly created eStore.
-
Resellers can have merchant accounts (true/false) – If one or more Resellers will be given the option of setting up their own merchant account to accept full payment for all associated eStore sales, then check this box to indicate “true.” However, if no Resellers will be given this option, leave unchecked to indicate “false.”
-
Allow Reseller To Upload Banners (true/false) – Possible future development. Leave blank for now. Not used at this time.
-
Default template name – The pre-set entry for this field is “main.” Please do not edit this default value.
-
Allow Reseller to Ship To Store Address – If one or more Resellers will be given the option of shipping to a physical store address of their choosing, then check this box to indicate “true.” However, if no Resellers will be given this option, leave unchecked to indicate “false.”
-
Allow Reseller to Add Domain – If one or more Resellers will be given the option of setting up their own custom Domain or Subdomain, then check this box to indicate “true.” However, if no Resellers will be given this option, leave unchecked to indicate “false.”
Admin Values
-
Platform in test mode – Check this box only in the case that the Platform is not live, or is undergoing tests such that successful sales transactions can occur, but no credit cards accounts will be charged. Generally, stage platforms remain in test mode continually, and production platforms are in test mode only prior to their live launch.
-
Admin Platform Image – Possible future development. Leave blank for now. Not used at this time.
-
Platform Name – Enter the Platform Name as it should display in the top left-hand corner of the Admin screen (i.e. CSC eStoreXpress).
Propay Setup
Propay provides a merchant gateway that is not currently being utilized by CSC eCommerce Platform clients, but may be added with future development. Please leave these fields blank for now.
Authorize.net Test Parameters
If the Platform is utilizing the Authorize.net gateway, the related test user name and password should be entered into these fields. If Authorize.net is not being used, leave blank.
Alternate Email Addresses
If Platform management desires to copy additional parties on certain system-generated emails (i.e. Return Merchandise Authorization, New Reseller Setup, or Login Trouble) then up to two additional email addresses may be entered into these fields for receipt of these “extra” notifications.
Global Email Substitutions
Throughout the content of System-Generated Emails (SGEs) frequently referenced values that differ from platform to platform are pulled in via substitution codes. Enter the Platform-specific values here for the Domain, Email Address Domain, Platform Name, and Signature.
Store Redirects
Enter the values here where a potential Platform eStore customer should be redirected should they navigate to an invalid or inactive eStore, or to no store at all.
If no store is requested, the customer is generally redirected to a Platform informational site or to a sell site. However, if an invalid or inactive store is entered, customers will likely be redirected to a Platform-owned corporate store or to the demo store, which in most cases is store 1000. The second field below for “URL to redirect when a valid and active store is entered” can be left blank in most all scenarios so as not to move the customer away from their intended eStore destination.
If the redirect URL is to a site outside of the Platform, the complete URL – including http:// – must be entered (i.e. http://www.commercescience.com). On the other hand, if the redirect goes to a page or eStore internal to the Platform, just the portion of the URL following the Platform URL is required (i.e. /store/1000).
Store Display Flags
-
Show Top 5 Ads on Main Page (true/false) – Leave blank. Not used at this time.
-
Show Bottom 3 Ads on Main Page (true/false) – Leave blank. Not used at this time.
-
Vendors to allow products to show up in printer lookup (CSV) – Possible future development. Leave blank for now. Not used at this time.
-
Zero Price Override Text – If any item is offered on Platform eStores at a $0 selling price, and the setting to “Show Text on Zero Price” is selected, then the text entry in this field will display on this item’s product detail page on store.
Transaction Fee Values
Possible future development. Leave blank for now. Not used at this time.
Customer Settings
-
Allow customer to change stores (true/false) – If the Platform will allow a logged-in customer to shop on any Platform eStore, then check this box to indicate “true.” However, if the Platform prefers that customers are permanently affiliated with the eStore on which they originally setup their customer account (and cannot change stores), then leave this box unchecked to indicate “false.” If unchecked (changing stores is NOT allowed), any customer trying to checkout on an unaffiliated eStore will automatically be re-directed to their affiliated store and their shopping cart will be emptied if applicable.
-
Allow guest customer to check out (true/false) – If the Platform will allow customers to check out as a guest without creating or logging into a customer account, then check this box to indicate “true.” However, if the Platform prefers that customers must create or login to a customer account on store (and cannot check out as a guest), then leave this box unchecked to indicate “false.” If checked (guest check out IS allowed), then a “Guest Checkout” button will display on the initial check out page in the shopping cart, and if unchecked (guest check out IS NOT allowed), then the only option to proceed thru check out will be to create or login to a customer account on store.
-
Allow customer tokenization – Check this box to allow customer tokenization, and leave unchecked to disallow it. If customer tokenization is enabled on the Platform, then customers will have the options to place re-orders, setup recurring orders, and save credit card information within their secure eStore customer account.
ACH Values
The following settings apply to any Platform allowing Resellers and/or Vendors to be paid directly to designated bank accounts via ACH transactions.
-
Is ACH active – Check this box if ACH is active on the Platform. Leave unchecked if it is not.
-
ACH User Id – Provided by the ACH provider. Enter alpha-numeric User Id here (i.e. 131529755481).
-
ACH Key – Provided by the ACH provider. Enter alpha-numeric ACH Key here (i.e. 3e6912943g774r0f814dec5dgg3hsa20).
-
ACH in test mode (ACH must be active) – Check this box if ACH is in test mode on the Platform (no dollars will be transferred between bank accounts). Leave this box unchecked if ACH is in live mode.
-
ACH Test User Id – Provided by the ACH provider. Enter alpha-numeric Test User Id here (i.e. 131529752693).
-
ACH Test Key – Provided by the ACH provider. Enter alpha-numeric ACH Test Key here (i.e. 118b449fa6d735619b63e99753524h9b1).
Search Values
The following settings are related to the configuration of on-store search functionality.
-
Search Fields – This field contains the comma-separated code names for the six default Search Fields on store. These fields are: Product Name, SKU Number, Brand Name, Short Description, Tag Text, and Alternate Item Description (or Category Text). The continuous code name value is: productName,sku,brand,shortText,tags,altItemDescription. Do not edit this value unless you would like to remove a Search Field and/or change the chronological order of the field references.
-
Search Analyzer – Leave the default value of StandardAnalyzer. Do not delete or edit this value.
-
Search Directory – Leave the default value of /site1/SAN/storemanager/lucene. Do not delete or edit this value.
-
Search Priority Results – Check this box for the search results to display in order of the most to least relevant in relation to the entered criteria (recommended). Leave this box unchecked for the search results to display in random order following a query.
Manage Information Page Names
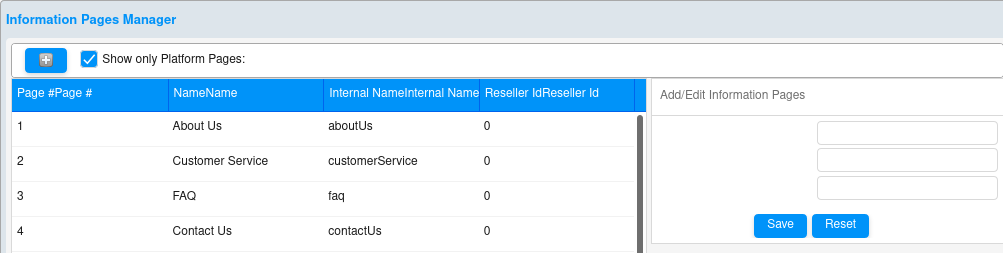
Click on the “Manage Platform” button and select the “Manage Information Page Names” tab from the left navigation pane. All Information Pages will be listed here (see image below).
Field Definitions
-
Page # – System-generated Information Page Id number. This number cannot be edited.
-
Name – The Information Page’s external name, which is how it will display on store as a global hyperlink within a navigation bar (if applicable).
-
Internal Name – The code reference for the associated page or content area, as used in URLs and source code.
-
Reseller Id – System-generated Reseller identification number. Information Pages available to the entire Platform display a “0” here because they are associated with all Resellers, not a specific one. Pages setup for an individual Reseller will display the associated Reseller’s Id number in this column (i.e. 1015).
Adding an Information Page
Click on the + button and a cursor will appear in the top field of the right-hand “Add/Edit Information Pages” pane. Enter the external page “Name” into the top field; enter the “Internal Name” into the second field; and enter the “Reseller Id” into the third field – “All” for the Information Page to be available to all eStores (this will convert to a “0” when saved), or specify a single “Reseller Id” number for the new page to be available to one eStore only. Click the “Save” button to setup the new Information Page.
Editing an Information Page
Highlight the Information Page to be edited, and its associated data will display in the right-hand “Add/Edit Information Pages” pane. Edit the values as desired and click “Save” to retain the changes.
Edit Information Pages
Click on the “Manage Platform” button and select the “Edit Information Pages” tab from the left navigation pane. Here you may edit the content of the Platform default Information Pages, such as “About Us,” “Appointments,” “Services,” “Privacy,” “Security,” etc. The content saved to these pages will display by default on all newly created eStores.
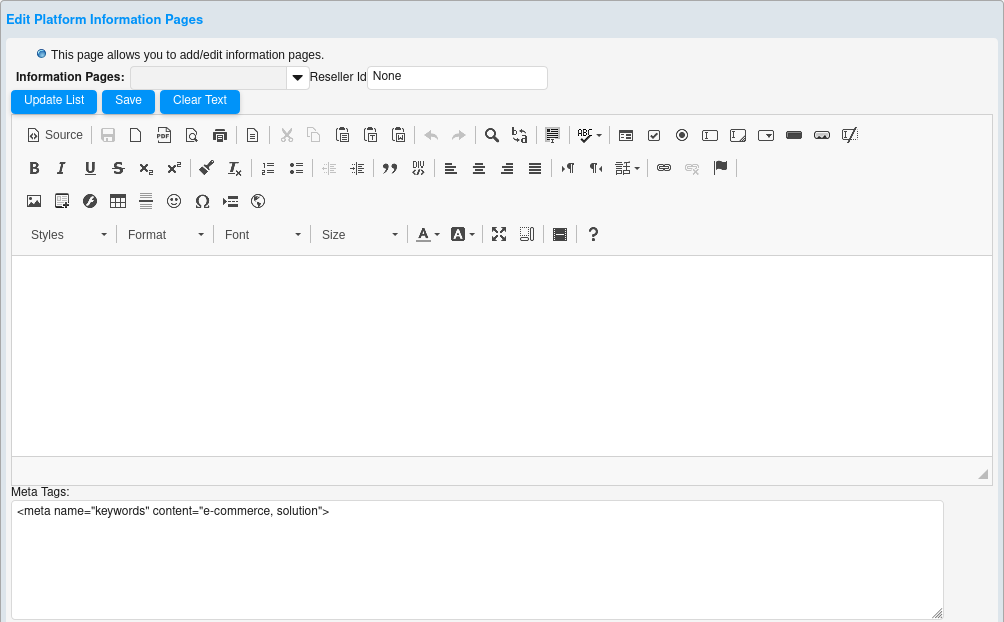
Meta Tags
Meta Tags specific to each Information Page may be entered in the lower pane of each page editor. Please use the appropriate HTML formatting as shown in the example above.
Meta tags are one tool that can help boost search engine rankings when used correctly. Technically, they are data tags that lie between the open and closing head tags in the HTML code of a web page. The text in these tags is not displayed online; however, it “tells” the browsers, search engines, etc. specific information about the page.
Source Code View
For more advanced formatting options, click the “Source” button to change the edit pane to the HTML source code. The Information Page editor is fully HTML capable. Use the source code window to customize your text, background and layout. Pull in images, flash files, videos, etc.
To view how the entered code will display on store, simply click the “Source” button again. This button will toggle the edit view from the source code back to the normal display mode, and vice versa.
Platform Controlled vs. Reseller Override
The Platform Administrator determines which Information Pages may be edited and overridden by Resellers, and which ones are fixed by the Platform with no override privileges. For example, the Platform commonly allows Reseller override for the “About Us” and “Services” pages so that each Reseller can customize the content to their specific business; however, editing of the “Privacy” and “Security” pages is generally not allowed in order to maintain consistency and accuracy of the information.
Information Page Menu Options
About Us – Serves as an introduction from the Reseller to the eStore customer. Use this page to provide a generic introduction to the Platform's goals and offerings while establishing credibility and seeking to gain a competitive edge. In most cases, Platform management allows Resellers to edit the “About Us” page, so a basic outline suggesting appropriate content or providing an example would be suitable as well.
Customer Service – Provides a summary of services offered, service philosophy, goals, guarantees, etc. May include contact data or return merchandise information as well. Depending on how eStore-related customer service inquiries are being handled, the “Customer Service” page may be Platform controlled, Reseller driven, or a combination of the two.
FAQ – Answers Frequently Asked Questions to help address the more common customer inquiries directly on the eStore site. The “FAQ” page may be Platform controlled, Reseller driven, or a combination of the two.
Contact Us – A system generated form collects the Name, Email, Phone Number, and Comments from the eStore customer. Only the text displaying above the form fields can be edited via this Information Page. The “Contact Us” page generally tells eStore customers how best to contact the Reseller. Therefore, in most cases, Platform management allows Resellers to edit the content of this page in order to customize it with their specific contact info.
Banner – This Information Page is not being used at this time as eStore banner content is widget driven. Please do not enable or allow editing of the “Banner” Information Page for now.
Privacy – Provides the official “Privacy” statement for the eCommerce Platform. This page is generally Platform controlled to protect the integrity and accuracy of the content.
Security – Provides the official “Security” statement for the eCommerce Platform. This page is generally Platform controlled to protect the integrity and accuracy of the content.
Returns – Provides information on the process for returning merchandise purchased from an eStore. Often hyperlinks to the Return Merchandise Authorization (RMA) form. Depending on how eStore-related customer inquiries are being handled, the “Returns” page may be Platform controlled, Reseller driven, or a combination of the two.
Services - The “Services” page can be used to itemize or describe the services offered thru a given eStore, to display a price list, etc. In most cases, Platform management allows Resellers to edit the content of this page in order to customize it to their specific businesses.
Appointments – A system generated form collects the Name, Requested Date, Requested Time, Email, Phone Number, and Comments from the customer. Only the text above this standard form can be customized. The “Appointments” page generally tells eStore customers the type of appointment that can be requested by submitting the form, the hours of operation, when to expect as response, etc. Therefore, in most cases, Platform management allows Resellers to edit the content of this page in order to customize it with their specific info.
RMA Form - “RMA” stands for Return Merchandise Authorization. A system generated form collects the Name, Email, Phone Number, Order #, and Comments from the customer. Only the text displaying above the form fields can be edited via this Information Page. The customer will be directed here when he/she needs to return a product. Depending on how eStore-related customer inquiries are being handled, the “RMA Form” page may be Platform controlled, Reseller driven, or a combination of the two.
Footer 2 – This Information Page is not being used at this time as eStore footer content is widget driven. Please do not enable or allow editing of the “Footer 2” Information Page for now.
Signup Footer – This Information Page can be used only if the Platform-driven Reseller Signup Page(s) are setup. If this is the case, then the content entered here will apply to the footer of these pages. If Reseller Signup Page(s) are not being utilized on the Platform, then do not enable or allow editing of the “Signup Footer” Information Page.
Checkout Page Text – Notes or information about the checkout process can be entered here, and this “Checkout Page Text” then displays on the first page of the eStore shopping cart. A customer accesses this page on store immediately after clicking the “Shopping Cart” link (provided the cart is not empty).
Checkout Final Page Text – This Information Page is not being used at this time, but may be added with future development. Please do not enable or allow editing of “Checkout Final Page Text” for now.
Place Order Page – Notes or information about the final order process can be entered here, and this “Place Order Page” text then displays on the “Review & Place Order” page of the eStore shopping cart just prior to order submission.
Order Confirmation Page – Notes or information about follow-up order procedures can be entered here, and this “Order Confirmation Page” text then displays on the “Order Confirmation” page of the eStore shopping cart following final order submission.
Top Menu – In the lower “Meta Tags” section of the “Top Menu” page, the Platform indicates which Information Page global links should display (and in what order) in the North Container navigation bar of the eStores. The formula to pull in these global links is shown in the screen shot below.
Bottom Menu – In the lower “Meta Tags” section of the “Bottom Menu” page, the Platform indicates which Information Page global links and contact info (email address and/or phone number) should display (and in what order) in the South Container navigation bar of the eStores.
Global Header Javascript – The Platform Administrator may opt to setup a free Google Analytics account, and utilize it to generate statistical information about incoming traffic, visitors, etc. To integrate this functionality with the Platform software, simply enter and “Save” the code generated by the affiliated Google Analytics’ account into the lower “Meta Tags” section of the “Global Header Javascript” page.
Checkout Header Javascript – Those who are familiar with the coding options provided by their Google Analytics’ account may opt to generate separate header javascript for the eStore checkout pages. If this is the case, enter and “Save” this code generated by the affiliated Google Analytics’ account into the lower “Meta Tags” section of the “Checkout Header Javascript” page.
Reseller Global Header Javascript – If Platform management intends to give Resellers the option to setup their own Google Analytics’ accounts to be affiliated with their specific eStores, then the “Reseller Global Header Javascript” Information Page needs to be enabled for both Platform and Reseller edit (see section 6.6. Manage Information Pages). There should be no content entered on this page by Platform management; however, if Resellers opt to enter code on this page, both the Platform’s and the Reseller’s Global Header Javascript will be posted to all eStore pages so that both Platform and Reseller can generate the related statistical reports.
Reseller Checkout Header Javascript – Again, if Platform management intends to give Resellers the option to setup their own Google Analytics’ accounts to be affiliated with their specific eStores, then the “Reseller Checkout Header Javascript” Information Page needs to be enabled for both Platform and Reseller edit as well (see section 6.6. Manage Information Pages). There should be no content entered on this page by Platform management; however, if Resellers opt to enter code on this page, both the Platform’s and the Reseller’s Checkout Header Javascript will be posted to all checkout pages so that both Platform and Reseller can generate the related statistical reports.
Manage Information Pages
Click on the “Manage Platform” button, and select the “Manage Information Pages” tab. All Information Pages available to the Platform will be listed in the left-hand column. Each page has an adjacent check box to “Allow Platform to Edit” and a second check box to “Allow Reseller to Edit.” Check the middle column boxes for all Information Pages the Platform would like to setup (with or without Reseller Edit privileges), and check the right-hand column boxes for those which Resellers will be allowed to edit, and in most cases, override Platform content. See below screen shot for a complete listing of Platform Information Pages, as well as the typical page settings that allow Reseller edit.
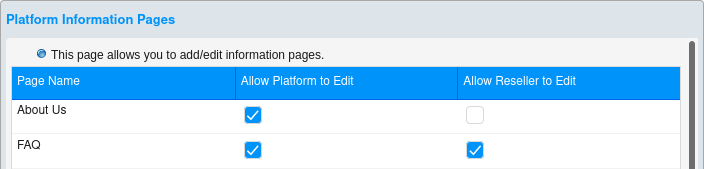
Image Manager
Click on the “Manage Platform” button, and select the “Manage Information Pages” tab. The Image Manager allows access to multiple graphic files, by type, that are available for display on Platform eStores. Images and flash files previously loaded will display here, and it provides a method for adding and/or deleting image files as well.
Click on the tab for the desired image type.This page has tabbed sections, representing sub-directories, for organizing the Platform images. These include: Callout Images, Category Images, System Images, Banners, Hosted Images, Hosted Flash Files, and Ads. Allowable image file types are .jpg, .png, and .gif (including animated .gifs and transparent .gifs), and only .swf flash files are permitted.
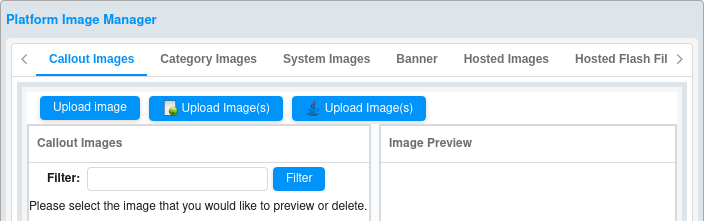
Image Manager Views
Panes
The image directory screens per image type (Callout Images, Category Images, System Images, Banners, Hosted Images, Hosted Flash Files, and Ads) are divided into two panes:
1) Thumbnails – All images loaded to each directory tab are displayed as thumbnails in the left-hand pane.
2) Image Preview – When a thumbnail image is selected (clicked on), a larger preview of it will display in the right-hand pane. The “Image Name” and “Image Path” are also provided above the image preview.
View Actual Size
Click the “View Actual Size” button in the “Image Preview” pane to display the full-size image as originally loaded.
Image Directories
Callout Images – When initially navigating to Manage Platform -> Image Manager, the “Callout Images” tab (directory) displays by default. Callout Images are slated for future development. Upon completion, they will serve as highlight captions that can be pulled into various product detail page displays on store (i.e. Sale! or Great for Mother’s Day!). Allowable image file types are .jpg, .png, and .gif (including animated .gifs and transparent .gifs).
Category Images – Category Images are generally referenced when creating display Headers or Footers for the various category pages on store. Allowable image file types are .jpg, .png, and .gif (including animated .gifs and transparent .gifs).
System Images – System Images are currently referenced when utilizing the Logo Widget, and will likely be slated for additional functionality with future development (i.e. creating customized button designs, etc.). For now, upload to this directory if logo images are needed to create eStore templates. Allowable image file types are .jpg, .png, and .gif (including animated .gifs and transparent .gifs).
Banner –Uploaded banner images will display on the Banner tab, and will be available to post on eStore templates via the Static and Dynamic Banner Widgets. Allowable image file types are .jpg, .png, and .gif (including animated .gifs and transparent .gifs).
Hosted Images – Pull these images into Widget content such as the Company Information Widget or the Slide Show Widget. Preview specific Hosted Images to view and copy the file path. This URL path can be referenced on any page or section of the eStores that is HTML capable – for example, the Information Pages (About Us, Services, etc.), Category Page Headers and Footers, within Arbitrary HTML Widgets, etc. Allowable image file types are .jpg, .png, and .gif (including animated .gifs and transparent .gifs).
Hosted Flash Files –Reference the loaded flash files on the eStore templates where you want to add flash content. Preview specific flash files to view and copy the file path. This URL path can be referenced on any page or section of the eStore that is HTML capable – for example, the Information Pages (About Us, Services, etc.), Category Page Headers and Footers, within Arbitrary HTML Widgets, etc. Only .swf file format is allowed.
Ads – Use these images to display advertisements on store. Ads may be uploaded in their original dimensions, or proportionally converted to 200px or 100px squares. Just select the appropriate radio button prior to loading. If the original image is not a perfect square, white space will be added as necessary so as not to distort the Ad display on store. Pull these images into the Advertising Widget, or into any page or section of the eStore that is HTML capable – for example, the Information Pages (About Us, Services, etc.), Category Page Headers and Footers, within Arbitrary HTML Widgets, etc. Allowable image file types are .jpg, .png, and .gif (including animated .gifs and transparent .gifs).
Upload Image Options
-
Upload Image – The first button available above the left-hand pane of each image directory tab is for uploading a single image. Click on this button to bring up the “File Upload” box. Navigate to the image to be uploaded and select it. The newly selected image will be added to the image directory, and will display as a thumbnail in the left-hand pane.
-
Upload Image(s) – The second button with the icon is for loading multiple images via a Basic HTML file uploader. This upload process should be available by default with most every operating system. Click on this button to bring up the “Upload images” box. See screen shot below.
Click the “Browse” button to bring up the “File Upload” box. Navigate to the images to be uploaded and select them. Then, click the “Upload” button. The names of the newly loaded image files will display in a list, followed by an “Upload more files” hyperlink. You may either continue uploading more image files by this same method, or close the “Upload images” box. The newly selected images will be added to the image directory, and will display as a thumbnails in the left-hand pane.
Upload Image(s) – The third button with the icon is for loading multiple images via a Java file uploader. For this upload process to be available, the latest version of Java must be loaded to your computer. Click on this button to bring up the Java “Upload Images” box.
Deleting an Image
To delete an image from any tabbed directory – Callout Images, Category Images, System Images, Banners, Hosted Images, Hosted Flash Files, or Ads – select the image by clicking on its thumbnail in the left-hand pane, and then click the “Delete” button in the “Image Preview” pane. The deleted image will be removed from the image directory and will no longer display as a thumbnail in the left-hand pane.
Price Level Manager
Click on the “Manage Platform” button, and select the “Price Level Manager” tab. “Level 1” will display as the default Platform price level.
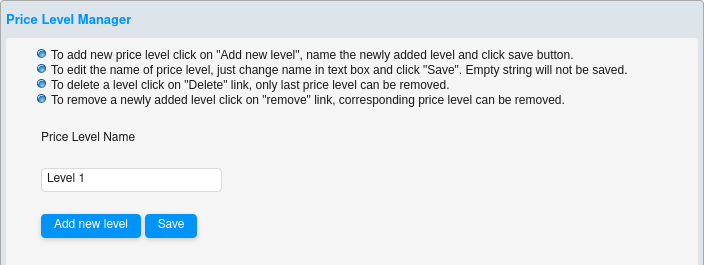
Adding a Price Level
Click the “Add New Level” button. A new blank Price Level field will display below Level 1 (left image below). Enter a name for the newly created Price Level (right image below). Click the “Save” button to retain the new Price Level, or click the Remove hyperlink adjacent to the new field to delete the new level.
The Platform Administrator may opt to setup six additional Price Levels (for a total of seven) to provide more options to both Vendors and Resellers.
Editing Price Levels
To change the Price Level name(s), simply edit the name text within the respective field(s) and click “Save.”
Deleting a Price Level
To delete a Price Level, click the Delete hyperlink adjacent to the last Price Level listed. Only one Price Level (the last one listed) can be deleted at a time.
Price Level Applications
If the Platform offers multiple Price Levels, the following options will be available:
1) Every item loaded to the Platform, across all Vendor accounts, can be assigned multiple Price Levels, each of which has a unique combination of selling price, Reseller commission, and Platform margin.
2) Resellers may assign any available Price Level to their entire eStore.
3) Platform Management may opt to setup Product Price Groups as well, thereby allowing Resellers to further refine their pricing strategy. For example, if Product Price Groups are setup for “Apparel” and “Electronics” respectively, a Reseller may select one Price Level for their overall store; however, segment the products in the available Product Price Groups (Apparel and Electronics) and price them differently, if so desired.
4) Resellers may also opt to assign alternate Price Levels (other than the one applied to their eStore overall) to specific customers. For example, if a Reseller has an eStore customer who buys products in large quantities, the Reseller may choose to assign a more aggressive Price Level to this customer. NOTE: The customer must be logged into his/her affiliated eStore account for the special pricing to take effect.
Printer Lookup Short List
Click on the “Manage Platform” button, and select the “Printer Lookup Short List” tab from the left navigation pane. This section only applies to Platforms carrying ink and toner products. This screen (sample shown below) displays two panes – the entire “Manufacturer List” in the left-hand pane, and the “Preferred List” in the right-hand pane.
There are a large number of manufacturers of ink and toner related products; however, the key suppliers comprise a much smaller sub-group. This screen allows the Platform Administrator to determine which manufacturers to include in the “Short List” of major suppliers.
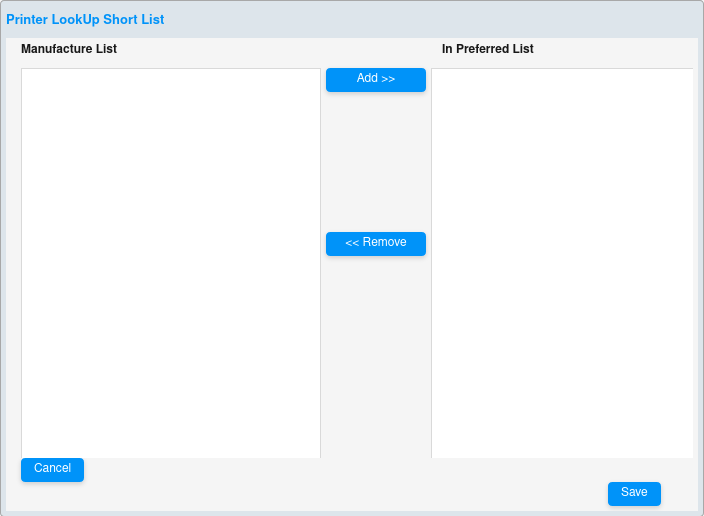
Creating the Printer Lookup Short List
To add a manufacturer to the Short List, simply highlight the manufacturer name in the “Manufacturer List” pane and click the “Add >>” button to place it “In Preferred List.” Conversely, to remove a manufacturer from the Short List, simply highlight the manufacturer name on the right-hand “In Preferred List” pane and click the “<< Remove” button.
The selections saved on the “Printer Lookup Short List” (above) will then impact the “Cartridge Finder” widget display on store. When a customer initially accesses the “Select Manufacturer” drop-down menu when searching for a cartridge or accessory, the Short List of manufacturers (as determined here) will display first. Following this listing of key manufacturers, the customer may opt to select “More…” at which time the entire list of manufacturers will display. See sample on-store manufacturer drop-down menu below.
Product Price groups
Click on the “Manage Platform” button, and select the “Product Price Groups” tab. The Platform Administrator has the option to setup “Product Price Groups” which can include a mix of items from across all Platform Vendors. The purpose of these Price Groups is to create greater flexibility for eStore pricing by allowing unique price levels (independent of the overall eStore price levels) to be assigned to each Product Price Group.
For example, product categories that have differing margins – such as apparel, jewelry, electronics or office supplies – could be setup in separate Product Price Groups. Resellers could then opt to be more aggressive with their pricing for the higher margin apparel and jewelry items, while being less aggressively priced for the typically lower margin electronics and office supplies.
Adding Product Price Groups
Click the “Add” button to bring up the “Add New Price Level Group” box. Enter the name for the new Product Price Group into the text field (i.e. Apparel).
Editing Product Price Groups
Click on the edit hyperlink in the far right column of the Price Group to be modified. This will bring up the “Edit Price Level Group” box where the name can be edited and saved.
Deleting Product Price Groups
Click to highlight the Product Price Group to be deleted, and click the “Delete” button. The selected Price Group will be removed from the list.